Tuesday, June 20, 2023

How to Build a Lean-To Off a Metal Shed

How to Build a Lean-To Off a Metal Shed

Adding a lean-to extension to your existing metal shed can significantly increase your storage space and provide additional functionality. Whether you need extra room for gardening tools, equipment, or workspace, a lean-to off a metal shed offers a cost-effective and efficient solution. In this article, I will guide you through the process of building a lean-to extension onto your metal shed, allowing you to maximize the utility of your outdoor storage area.

Step 1: Plan and Design

The first step in building a lean-to off a metal shed is to plan and design your extension. Determine the size and dimensions of the lean-to based on your storage needs and the available space around your metal shed. Consider the purpose of the extension and whether it will be used for storage, workspace, or as a sheltered area. Sketch out your design, including measurements and details, to ensure a smooth construction process.

Step 2: Gather the Materials

Before you begin construction, gather all the necessary materials for building the lean-to extension. Here's a list of the items you'll typically need:

  • Pressure-treated lumber for the frame
  • Metal roofing sheets or other suitable roofing material
  • Screws or bolts for securing the structure
  • Tools: measuring tape, circular saw, drill, level, ladder, and safety equipment

Make sure to have all the required materials on hand before starting the construction process to avoid delays.

Step 3: Prepare the Area

Clean the area where the lean-to will be attached to the metal shed. Remove any debris or obstructions and ensure the ground is level. This will provide a stable foundation for your lean-to extension.

Step 4: Build the Frame

Begin by constructing the frame of the lean-to extension. Use pressure-treated lumber to build the posts and beams according to your design. Attach the frame securely to the metal shed using screws or bolts. Ensure the frame is level and aligned properly to guarantee stability and structural integrity.

Step 5: Install the Roofing

Once the frame is in place, it's time to install the roofing material. Metal roofing sheets are a popular choice due to their durability and ease of installation. However, you can use other suitable roofing materials as well. Ensure the roofing material overlaps with the existing shed roof to prevent water leakage. Secure the roofing sheets to the frame using screws or bolts, making sure they are tightly fastened.

Step 6: Add Finishing Touches

To complete the construction of your lean-to extension, add any finishing touches that will enhance its functionality and aesthetics. Consider adding walls or screens to enclose the sides if desired. Install doors or access points for easy entry and exit. Add shelves, hooks, or storage solutions to maximize the organization of your new storage space.

Remember to prioritize safety throughout the construction process. If you are unsure about any step or aspect of the project, consult with a professional or seek expert advice.

Congratulations! You have successfully built a lean-to extension off your metal shed, providing valuable additional storage and workspace.

Share:

Monday, June 19, 2023

How to Build a Walk-Through Lean-To Shed

How to Build a Walk-Through Lean-To Shed

A walk-through lean-to shed is a versatile and convenient outdoor structure that provides storage space while also offering a covered walkway. It can serve as a sheltered pathway from one area of your property to another, while also providing a practical storage solution. Whether you need a place to store gardening tools, bicycles, or other items, a walk-through lean-to shed can be a valuable addition. In this article, I will guide you through the process of building a walk-through lean-to shed, allowing you to create a functional and accessible outdoor space.

Step 1: Determine the Size and Location

Begin by determining the size and location of your walk-through lean-to shed. Consider the available space on your property and choose a location that allows for easy access and a convenient walkway. Measure the length, width, and height of the shed, taking into account the items you plan to store. Make sure to comply with any local building codes or regulations.

Step 2: Gather the Materials

Before you start building, gather all the necessary materials for your walk-through lean-to shed. Here's a list of the items you'll typically need:

  • Pressure-treated lumber for the frame and supports
  • Plywood or oriented strand board (OSB) for the walls and roof
  • Roofing material (such as metal sheets or shingles)
  • Nails or screws
  • Door hinges and latch
  • Tools: measuring tape, circular saw, hammer, drill, level, ladder, and safety equipment

Ensure you have all the necessary materials on hand before you begin construction to avoid unnecessary delays.

Step 3: Build the Frame

Start by constructing the frame of your walk-through lean-to shed. Begin with the two end walls, ensuring they are plumb and securely fastened. Then, install the roof trusses, evenly spaced and securely connected to the end walls. Double-check all measurements and ensure the frame is level and stable.

Step 4: Install Walls and Roof

Attach the plywood or OSB sheets to the frame to form the walls and roof of your walk-through lean-to shed. Ensure they are securely fastened and provide a weatherproof barrier. Cut openings for the walkway entrance and any windows, if desired. Install the roofing material, such as metal sheets or shingles, to protect the shed from the elements.

Step 5: Add Doors and Finishing Touches

Install a walk-through door at one end of the shed, ensuring it is properly aligned and functions smoothly. Consider adding windows for natural light if desired. Apply a weather-resistant sealant or paint to protect the wood and enhance the appearance of your walk-through lean-to shed. Consider adding shelves, hooks, or storage solutions inside the shed to optimize its functionality.

Step 6: Create the Walkway

For the walkway section, use pressure-treated lumber or concrete slabs to create a solid and level pathway. Ensure that it is wide enough for easy movement and consider adding handrails for safety, if desired. Install any additional features you want along the walkway, such as lighting or seating areas.

Congratulations! You have successfully built a walk-through lean-to shed, providing both storage space and a covered pathway. Now you can enjoy the convenience and functionality of your new outdoor structure. Remember to prioritize safety during construction. If you are unsure about any step of the process, consult with a professional or seek expert advice.

Share:

Sunday, June 18, 2023

How to Build a Lean-In Storage Shed

How to Build a Lean-In Storage Shed

A lean-in storage shed is a practical and efficient solution for adding extra storage space to your property. Whether you need a dedicated area for gardening tools, outdoor equipment, or seasonal items, a lean-in storage shed offers a compact and accessible storage solution. In this article, I will guide you through the process of building a lean-in storage shed, allowing you to organize your belongings and create a clutter-free environment.

Step 1: Determine the Size and Location

The first step in building a lean-in storage shed is to determine the appropriate size and location for your needs. Consider the amount of storage space required and the available space on your property. Choose a location that is easily accessible and provides convenient access to your stored items. Take into account any local building codes or regulations that may affect the construction of your shed.

Step 2: Gather the Materials

Before you begin construction, gather all the necessary materials. Here's a list of the items typically required:

  • Pressure-treated lumber for the frame and supports
  • Plywood or oriented strand board (OSB) for the walls and roof
  • Roofing material (such as metal sheets or shingles)
  • Nails or screws
  • Door hinges and latch
  • Tools: measuring tape, circular saw, hammer, drill, level, ladder, and safety equipment

Make sure you have all the necessary materials on hand before you start building to avoid delays during construction.

Step 3: Build the Foundation

Start by preparing the foundation for your lean-in storage shed. Depending on your preference and local conditions, you can use concrete footings, concrete blocks, or gravel pads as a base. Ensure that the foundation is level and provides a stable surface for the shed.

Step 4: Construct the Frame

Once the foundation is in place, you can begin constructing the frame of the storage shed. Cut the pressure-treated lumber to the desired dimensions, following your chosen design. Build the walls and roof supports, ensuring that they are sturdy and properly aligned. Use nails or screws to secure the frame together.

Step 5: Install Walls and Roof

Attach the plywood or OSB sheets to the frame to form the walls and roof of your lean-in storage shed. Ensure that the panels are securely fastened and provide a weatherproof barrier. Cut openings for doors and windows, if desired. Install the roofing material, such as metal sheets or shingles, to protect the shed from the elements.

Step 6: Add Doors and Finishing Touches

Install the doors using hinges and a latch to secure the storage shed. Make sure the doors are properly aligned and can be easily opened and closed. Consider adding shelving or hooks inside the shed to maximize storage space and organization. Apply a weather-resistant sealant or paint to protect the wood and enhance the appearance of your lean-in storage shed.

Congratulations! You have successfully built a lean-in storage shed. Now you can enjoy the benefits of having a dedicated storage space for your belongings.

Remember to prioritize safety during construction. If you are unsure about any step of the process, consult with a professional or seek expert advice.

Share:

Saturday, June 17, 2023

How to Build a Free-Standing Lean-To

Free-Standing Lean-To

If you're in need of extra covered space on your property but don't want to attach a structure to your house, a free-standing lean-to can be the perfect solution. Whether you want to create a sheltered area for outdoor activities or need a storage space for your gardening tools, a free-standing lean-to offers flexibility and functionality. In this article, I will guide you through the process of building a free-standing lean-to, allowing you to expand your living space in a practical and cost-effective way.

Step 1: Choose the Location

The first step in building a free-standing lean-to is to select the ideal location on your property. Consider factors such as accessibility, sun exposure, and the purpose of the structure. Ensure that the ground is level and clear any debris or obstructions in the chosen area. It's also important to check local building codes or restrictions that may apply to the construction of a free-standing structure.

Step 2: Gather the Materials

Before starting the construction, gather all the necessary materials. Here's a list of the items you'll typically need:

  • Pressure-treated lumber for the frame
  • Roofing material (such as metal sheets or shingles)
  • Plywood for the roof and sides
  • Nails or screws
  • Concrete mix for the footings
  • Tools: measuring tape, circular saw, hammer, drill, level, ladder, and safety equipment

Having all the materials on hand will help streamline the construction process.

Step 3: Build the Frame

Start by constructing the frame of your free-standing lean-to. Begin with the two end walls by cutting and assembling the pressure-treated lumber according to your desired dimensions. Use a level to ensure that the walls are plumb and secure them to the ground using appropriate anchors. Then, connect the end walls with the roof trusses, making sure they are evenly spaced and properly secured.

Step 4: Install the Roof and Sides

After the frame is in place, it's time to install the roof and sides of your free-standing lean-to. Attach plywood sheets to the roof trusses, ensuring they are securely fastened. Consider adding a slight slope to allow for proper water drainage. For the sides, you can use plywood, lattice panels, or even screens, depending on your preferences and intended use. Secure them to the frame, making sure they are sturdy and weatherproof.

Step 5: Add Finishing Touches

Once the main structure is complete, you can add finishing touches to enhance the functionality and appearance of your free-standing lean-to. Apply a weather-resistant sealant or paint to protect the wood from the elements. Consider adding gutters to collect rainwater, shelves for storage, or lighting for convenience. These additional features can make your lean-to even more versatile and user-friendly.

Remember, safety should always be a priority during construction. If you are unsure about any step of the process, consult with a professional or seek expert advice.

Congratulations! You have successfully built a free-standing lean-to. Now you can enjoy the additional space and utilize it for various purposes.

Share:

Friday, June 16, 2023

Organize and Declutter: Practical 4x6 Lean to Shed Design Ideas

Practical 4x6 Lean to Shed Design Ideas

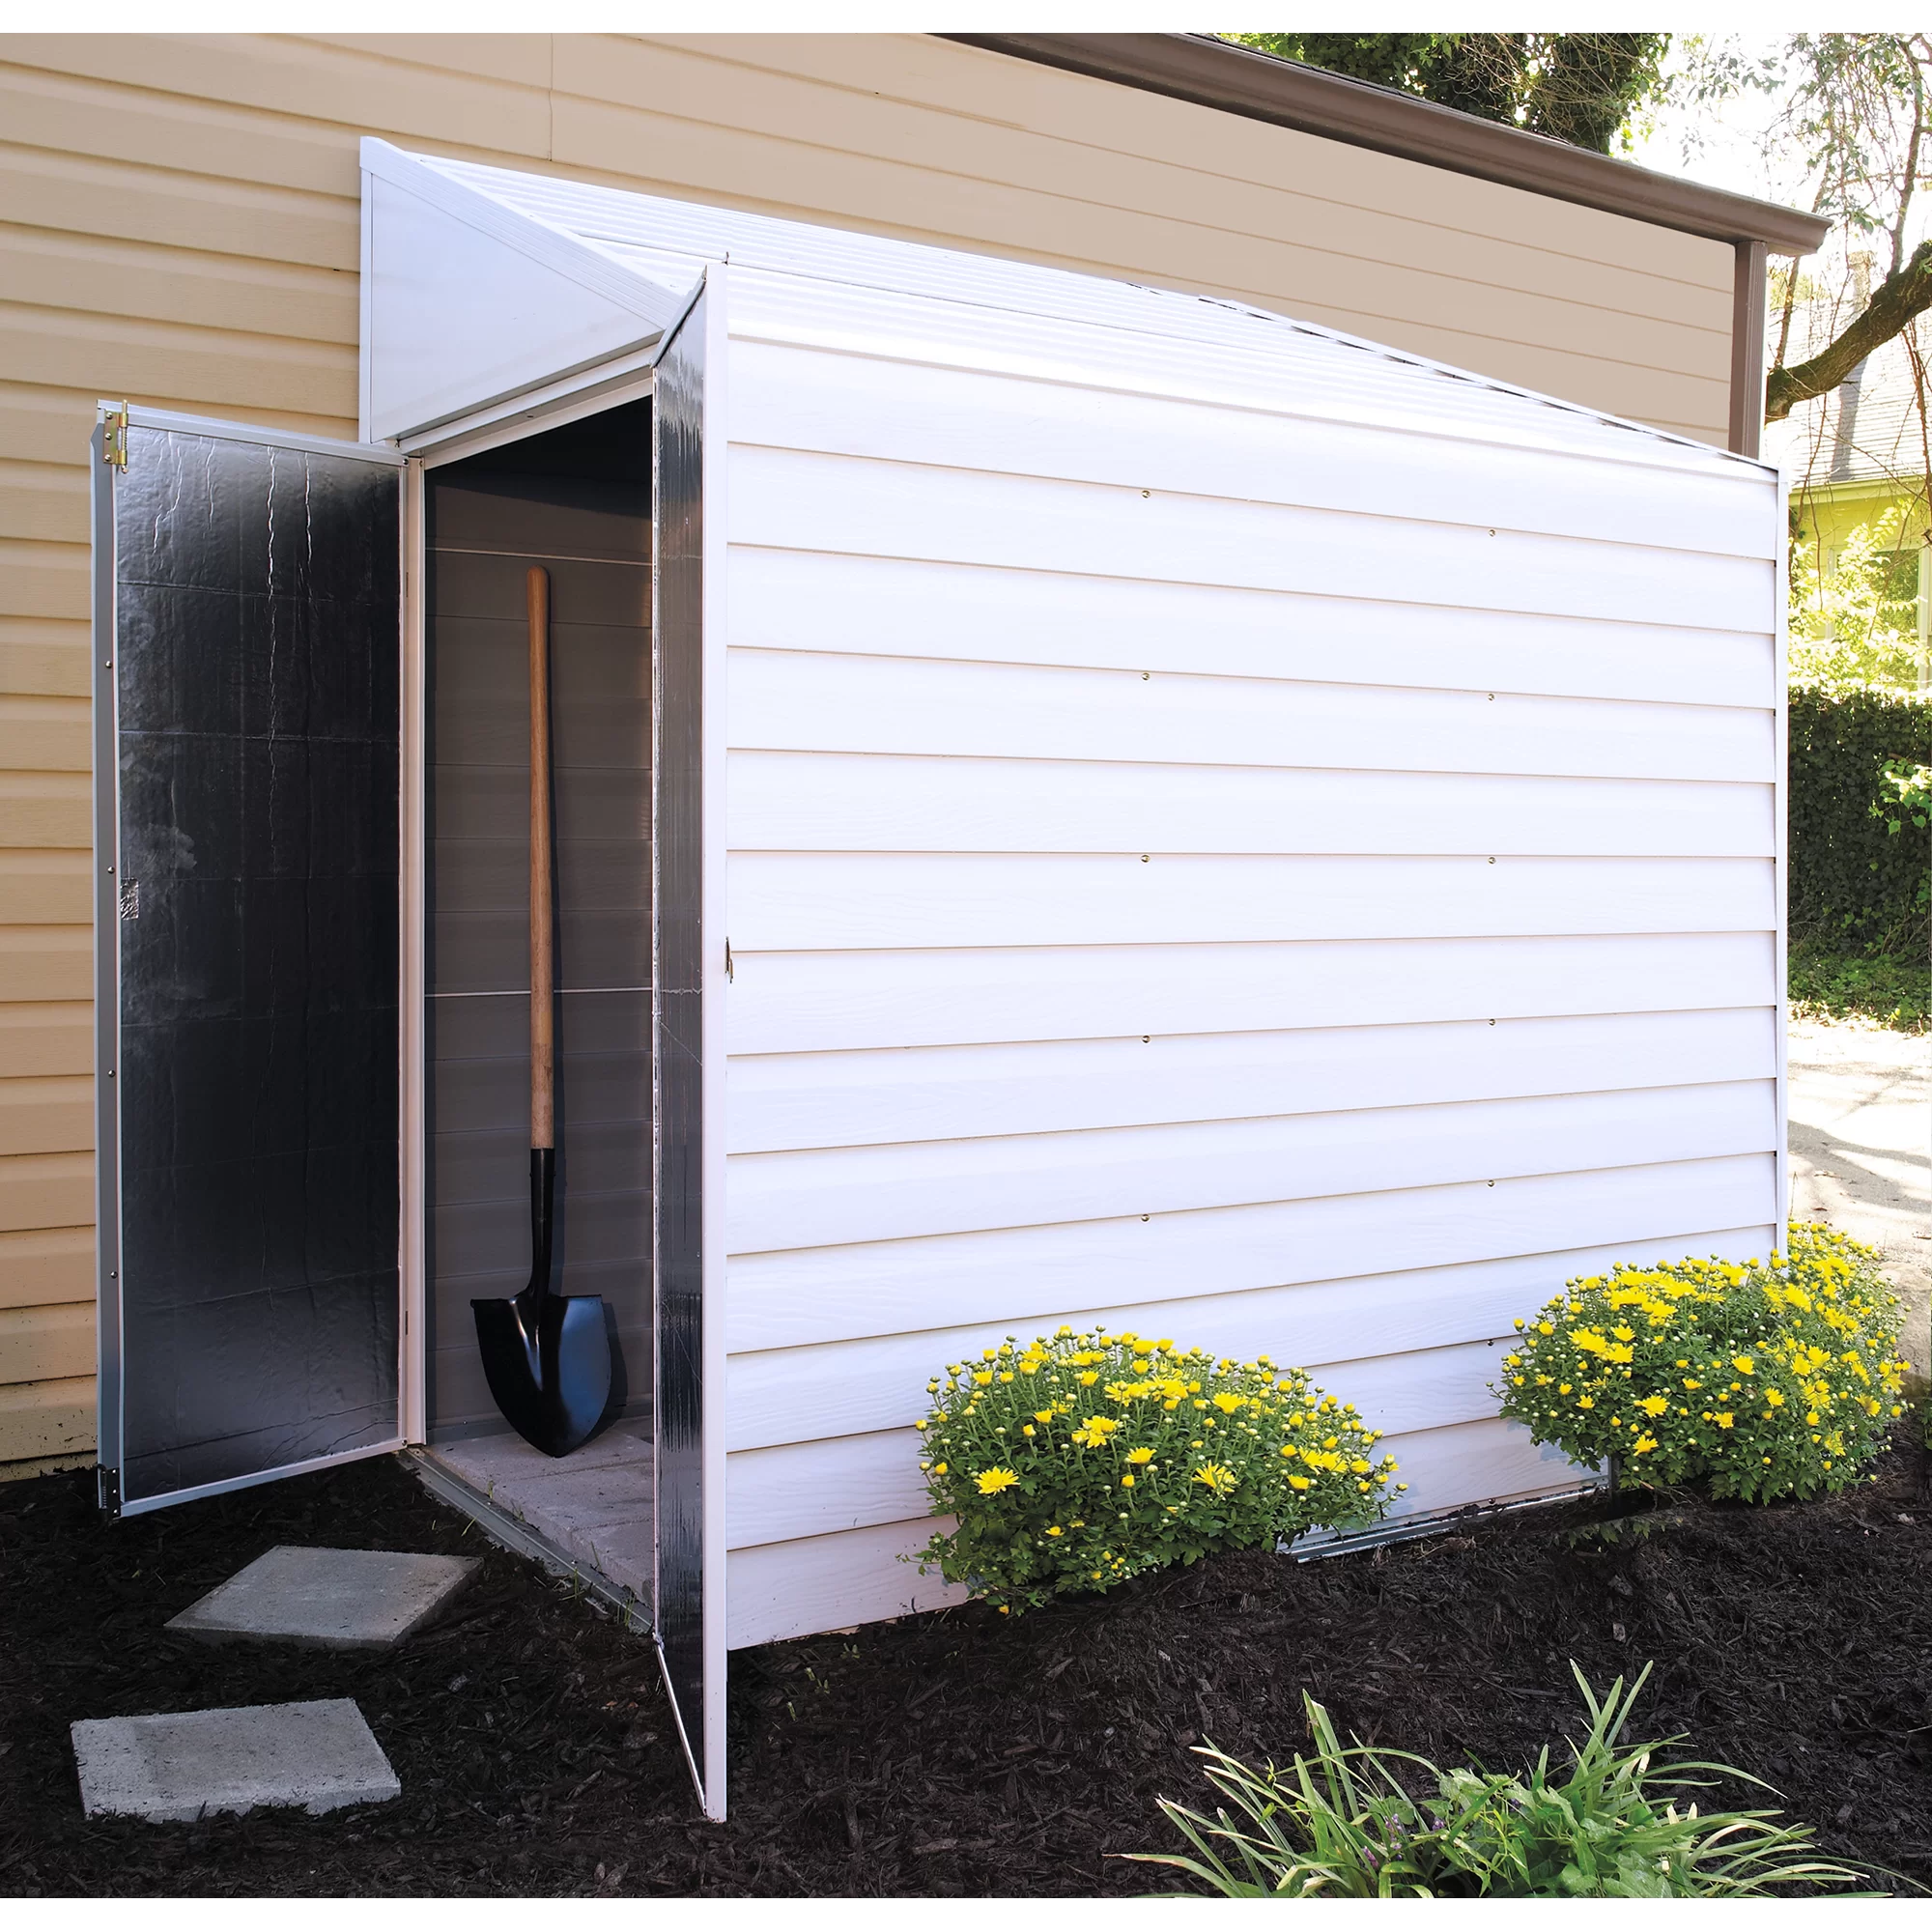
A 4x6 lean to shed offers a compact yet versatile space for organizing and decluttering your belongings. With smart design ideas, you can maximize storage efficiency and create an organized oasis. Discover practical 4x6 lean to shed design ideas to help you declutter and streamline your space.

1. Utilize Vertical Space

Make the most of your shed's vertical space by installing shelves, hooks, and hanging organizers. Utilize the walls to store tools, equipment, and other items, keeping the floor area clear and maximizing storage capacity.

2. Adjustable Shelving

Incorporate adjustable shelving units in your shed design. This allows you to customize the height and spacing of the shelves to accommodate items of various sizes. Adjustable shelves provide flexibility and adaptability as your storage needs change over time.

3. Clear Storage Bins

Opt for clear storage bins or containers to easily identify the contents without the need to open each one. Label the bins for quick reference, ensuring that everything has a designated place and can be found easily.

4. Pegboards and Tool Racks

Install pegboards or tool racks on the walls to keep your tools organized and easily accessible. Hang items such as hammers, screwdrivers, and wrenches for convenient storage and efficient use of space.

5. Overhead Storage

Take advantage of the overhead space in your shed by installing overhead storage racks or suspended shelves. This area is ideal for storing seasonal items or rarely used items that can be accessed with the help of a ladder or step stool.

6. Magnetic Strips

Attach magnetic strips to the walls or inside cabinet doors to store and organize small metal tools, such as drill bits or small wrenches. Magnetic strips keep these items visible and within easy reach, reducing clutter on the work surfaces.

7. Workbench with Storage

Incorporate a workbench into your shed design, complete with built-in storage options. Drawers, cabinets, and shelves integrated into the workbench provide a convenient place to keep tools, supplies, and project materials, keeping your workspace tidy.

8. Folding and Hanging Options

Maximize space efficiency by using folding and hanging options. Install fold-down work surfaces, folding chairs, or drop-leaf tables that can be tucked away when not in use. Use wall-mounted hooks or hangers to hang items like bicycles, ladders, or garden hoses.

9. Zone Planning

Divide your shed into functional zones based on the type of items you store. Create a gardening zone, a tool storage zone, a sports equipment zone, or any other specific areas that align with your needs. This zoning helps maintain order and makes it easier to locate items.

10. Proper Lighting

Ensure adequate lighting in your shed to make it easier to find items and work efficiently. Consider installing LED lights or overhead fixtures that provide bright and even illumination throughout the space.

By implementing these practical design ideas, you can transform your 4x6 lean to shed into a well-organized and clutter-free space. Utilize vertical storage, adjustable shelving, clear containers, and designated zones to create an efficient storage system. With a thoughtfully designed shed, you'll enjoy a streamlined and functional space that simplifies your organizational tasks and helps you declutter your belongings.

11. Labeling System

Implement a labeling system to ensure everything in your shed has a designated place. Use clear and legible labels on storage bins, shelves, and drawers. This makes it easier to locate items quickly and maintain an organized space.

12. Tool Wall Organizer

Create a tool wall organizer by mounting a pegboard or tool rack on one of the shed walls. Arrange your tools in a systematic order, keeping frequently used tools within easy reach. This not only saves space but also allows for efficient tool selection and storage.

13. Compact Storage Solutions

Invest in space-saving storage solutions specifically designed for small spaces. Look for compact shelving units, stackable storage containers, or hanging organizers that maximize storage capacity without taking up excessive floor space.

14. Utilize the Shed Door

Don't overlook the back of your shed door as valuable storage space. Install hooks or racks on the door to hang small tools, gardening gloves, or other accessories. This clever use of space keeps frequently used items easily accessible and frees up room inside the shed.

15. Create a Recycle and Donation Station

Designate an area within your shed for recycling and donation items. Install separate bins or containers for recyclables, and designate a section for items you no longer need but can be donated. This encourages responsible disposal and keeps your shed clutter-free.

16. Wall-Mounted Cabinets

If you have limited floor space, consider installing wall-mounted cabinets. These cabinets provide additional storage without obstructing your movement within the shed. They are perfect for storing smaller items or keeping hazardous materials out of reach.

17. Utilize Ceiling Space

Make use of the ceiling space in your shed by installing overhead racks or hanging shelves. This area is suitable for storing items that are used less frequently, such as seasonal decorations or camping gear. By utilizing the ceiling, you maximize the storage capacity of your shed.

18. Outdoor Storage Solutions

If your shed's interior space is limited, consider incorporating outdoor storage solutions around the shed. Install hooks, racks, or shelves on the exterior walls to store frequently used items, such as gardening tools or sports equipment. This expands your storage options while keeping the interior organized.

19. Create a Workspace

If you plan to use your shed as a workspace, ensure you have a designated area for projects. Install a sturdy workbench or table that provides ample surface area for your tasks. Include storage drawers or cabinets beneath the work surface to keep tools and supplies within reach.

20. Regular Maintenance and Cleaning

Maintaining an organized shed requires regular maintenance and cleaning. Set aside time periodically to declutter, reorganize, and remove any items that are no longer needed. This helps you stay on top of your storage system and ensures a well-organized and functional shed.

By implementing these practical 4x6 lean to shed design ideas, you can create a space that promotes organization and decluttering. Utilize vertical and overhead storage, label your items, and create designated zones for different categories of belongings. With a well-organized shed, you'll enjoy easier access to your items and a cleaner, more functional space.

Share:

How to Build a Lean-To on a Shed

Build a Lean-To on a Shed

What is a Lean-To on a Shed?

A lean-to on a shed is an additional structure attached to the side of an existing shed. It typically consists of a slanted roof that slopes downward from the shed's wall, creating a covered area or an extension of the storage space. The lean-to is usually open on one or two sides, providing shelter from rain, sun, or other elements.

A lean-to on a shed can serve various purposes, including:

  1. Additional storage space: The lean-to can be used to store garden tools, equipment, firewood, bicycles, or any other items that need protection from the weather.
  2. Sheltered workspace: It can provide a covered area for DIY projects, gardening, or other outdoor activities, allowing you to work even during unfavorable weather conditions.
  3. Livestock or animal shelter: The lean-to can serve as a shelter for small livestock, such as chickens or goats, or provide a covered area for other animals, such as dogs.
  4. Outdoor relaxation area: You can create a cozy outdoor seating area or a covered patio space by adding some furniture or decorative elements to the lean-to.

The design and size of a lean-to can vary depending on individual preferences and the available space. It's important to consider local building codes, permits, and regulations before constructing a lean-to to ensure compliance with the law.

Materials you'll need:

  • Pressure-treated lumber (2x4 and 4x4 boards)
  • Plywood sheets
  • Roofing materials (shingles, metal sheets, or corrugated plastic)
  • Galvanized screws or nails
  • Level
  • Tape measure
  • Circular saw or miter saw
  • Drill or screwdriver
  • Safety goggles
  • Work gloves

Step 1: Planning and Preparation

  1. Determine the size and location of your lean-to. Measure the available space on the side of your shed where you want to attach the lean-to. Consider the purpose of the lean-to and plan accordingly.
  2. Obtain necessary permits or permissions from local authorities, if required.

Step 2: Clear the Area

  1. Remove any obstacles, vegetation, or debris from the ground where the lean-to will be constructed.
  2. Ensure the shed's wall is clean and free from any protruding objects.

Step 3: Building the Frame

  1. Measure and cut two 4x4 boards to the desired height of the lean-to.
  2. Attach one 4x4 board vertically against the shed's wall using galvanized screws or nails. This will act as the support for the lean-to.
  3. Measure and cut two 2x4 boards to the width of the lean-to. These will be the top and bottom plates.
  4. Attach the top and bottom plates horizontally to the 4x4 board, ensuring they are level and securely fastened.
  5. Measure and cut 2x4 boards to the desired height of the lean-to's roof slope.
  6. Attach these boards vertically between the top plate and the ground, evenly spaced to form the studs. The spacing will depend on the size of the lean-to, but a common spacing is 16 inches on center.
  7. Use a level to ensure the studs are plumb (vertical) and attach them securely to the top and bottom plates.

Step 4: Adding the Roof

  1. Measure and cut additional 2x4 boards to serve as the roof rafters. The number of rafters will depend on the width of the lean-to, but spacing them 24 inches apart is typical.
  2. Attach the rafters to the top plate, ensuring they are evenly spaced and perpendicular to the shed's wall.
  3. Measure and cut plywood sheets to fit the size of the roof. Place the plywood sheets on top of the rafters and attach them using screws or nails, spacing them appropriately.
  4. Apply the chosen roofing material (shingles, metal sheets, or corrugated plastic) over the plywood, following the manufacturer's instructions. Ensure the roofing material extends beyond the edges of the lean-to to provide adequate overhang.

Step 5: Finishing Touches

  1. Inspect the lean-to for any loose screws, nails, or connections. Tighten or reinforce as needed.
  2. If desired, paint or stain the lean-to to match the shed or to provide additional weather protection.
  3. Clean up the construction site, removing any waste materials and tools.

Congratulations! You have successfully built a lean-to on your shed. The lean-to can now be used for storage or as a covered area for various activities. Remember to follow local building codes and safety guidelines throughout the construction process.

Share:

Thursday, June 15, 2023

How to Measure and Prepare the Frame for a Lean-To Greenhouse

Measure and Prepare the Frame for a Lean-To Greenhouse

Measuring and preparing the frame for your lean-to greenhouse is a crucial step in the construction process. A well-measured and properly prepared frame will ensure the stability and structural integrity of your greenhouse. In this guide, we will walk you through the steps to measure and prepare the frame for your lean-to greenhouse.

1. Determine the Dimensions

Start by determining the dimensions of your lean-to greenhouse. Consider the available space, your gardening needs, and the desired size of the greenhouse. Measure the length, width, and height of the greenhouse, taking into account any specific requirements for your plants, shelving, or other features.

2. Select the Frame Material

Choose the appropriate material for your greenhouse frame. Common options include wood, metal, or PVC. Wood is a popular choice for its natural aesthetics and ease of construction. Metal frames provide durability and strength. PVC frames are lightweight, affordable, and resistant to corrosion. Select a material that suits your preferences, budget, and climate conditions.

3. Gather the Tools and Materials

Gather the necessary tools and materials for the frame construction. These may include measuring tape, a level, a saw, screws or nails, brackets or connectors (depending on the chosen frame material), and safety equipment such as gloves and goggles.

4. Mark the Wall or Structure

Mark the wall or structure where the lean-to greenhouse will be attached. Use a measuring tape and a pencil to mark the desired height and width of the greenhouse. Ensure that the markings are level and accurately represent the dimensions you determined earlier.

5. Measure and Cut the Frame Components

Using the measurements from the marked wall or structure, measure and cut the frame components accordingly. If you're using wood, use a saw to cut the wooden beams or planks to the desired lengths. Take precise measurements and ensure clean, accurate cuts to achieve a proper fit during assembly.

6. Prepare the Frame Components

Before assembling the frame, it's important to prepare the components for installation. Sand any rough edges or surfaces to prevent splinters or injuries. Apply a protective finish or sealant to the frame components, especially if you're using wood, to enhance durability and resistance to moisture.

7. Attach the Frame to the Wall or Structure

With the prepared frame components in hand, attach them to the marked wall or structure. Use appropriate screws, nails, brackets, or connectors depending on the chosen frame material. Ensure that the frame is securely fastened and level. Use a level to check the vertical and horizontal alignment of the frame as you attach each component.

8. Reinforce the Frame

To provide additional stability and support, reinforce the frame at key points. Use corner brackets, cross braces, or diagonal supports to strengthen the structure. This will help withstand wind loads and other external forces that may affect the stability of your lean-to greenhouse.

9. Check for Level and Square

After assembling the frame, check for levelness and squareness. Use a level to ensure that the frame is level from side to side and front to back. Verify the squareness by measuring the diagonals of the frame. Adjust the frame as needed to achieve a level and square structure, as this will contribute to the proper installation of the greenhouse panels.

By following these steps,you can effectively measure and prepare the frame for your lean-to greenhouse. Taking accurate measurements, selecting the appropriate materials, and ensuring proper alignment and stability will set a solid foundation for the rest of your greenhouse construction process.

Share:

How to Choose the Location for a Lean-To Greenhouse

Location for a Lean-To Greenhouse

Choosing the right location for your lean-to greenhouse is crucial for creating an optimal growing environment for your plants. The location should provide adequate sunlight, protection from harsh elements, and easy access for maintenance. In this guide, we will walk you through the important factors to consider when selecting the location for your lean-to greenhouse.

1. Sunlight Exposure

Sunlight is essential for plant growth, so it's important to choose a location that receives ample sunlight throughout the day. Ideally, the greenhouse should be situated in an area that gets at least 6 to 8 hours of direct sunlight daily. Observe the area throughout the day to determine if it is shaded by nearby trees, buildings, or other structures. Avoid locations that are heavily shaded or obstructed by surrounding objects.

2. Orientation

The orientation of your lean-to greenhouse plays a significant role in maximizing sunlight exposure. If you're in the northern hemisphere, consider placing the greenhouse on a south-facing wall or structure. This allows the greenhouse to capture the most sunlight during the day. In the southern hemisphere, a north-facing wall would be ideal. Orienting the greenhouse properly will optimize sunlight absorption and help create a favorable microclimate for your plants.

3. Wind and Weather Protection

Shielding your lean-to greenhouse from strong winds and extreme weather conditions is essential for maintaining a stable and protected environment for your plants. Look for a location that offers natural windbreaks, such as fences, trees, or existing structures. These barriers will help minimize wind exposure and protect your greenhouse from potential damage. Avoid areas that are prone to high winds or are completely exposed to the elements.

4. Accessibility

Consider the accessibility of the chosen location for your lean-to greenhouse. Ensure that it is easily accessible for maintenance tasks, watering, and plant care. You'll need a clear path to transport supplies, tools, and plants in and out of the greenhouse. Having access to water sources nearby will make watering more convenient. A location that is easily reached and doesn't require excessive effort to maintain is ideal.

5. Existing Structures

If you plan to attach your lean-to greenhouse to an existing structure, such as a house, shed, or garage, evaluate the suitability of the structure. Ensure that it is structurally sound and can handle the additional weight and stress of the greenhouse. Examine the condition of the structure and make any necessary repairs or reinforcements before proceeding with the greenhouse installation.

6. Local Regulations and Permits

Check your local regulations and permits regarding greenhouse construction. Some areas may have specific requirements or restrictions on the placement and size of greenhouses. Ensure that you comply with these regulations to avoid any legal issues or setbacks in your project.

7. Future Expansion

Consider your future plans and whether you may want to expand your greenhouse in the future. Leave enough space around the lean-to structure to accommodate potential expansions or additions. This foresight will save you time and effort if you decide to expand your greenhouse down the line.

By carefully considering these factors and assessing your specific needs, you can choose the ideal location for your lean-to greenhouse. Creating a suitable environment with proper sunlight exposure and protection will contribute to the success of your gardening endeavors.

Share:

How to Build a Wooden Lean-To Greenhouse

How to Build a Wooden Lean-To Greenhouse

Building a wooden lean-to greenhouse is a rewarding project that allows you to extend your growing season and nurture your plants in a controlled environment. A lean-to greenhouse is a great option if you have limited space or want to take advantage of an existing structure, such as a wall or a shed. In this step-by-step guide, we will walk you through the process of building your own wooden lean-to greenhouse.

1. Choose the Location

Start by selecting a suitable location for your lean-to greenhouse. It should receive ample sunlight throughout the day, preferably facing south to maximize exposure. Ensure that the area is level and easily accessible for maintenance and watering.

2. Gather the Materials and Tools

Collect all the necessary materials and tools for your project. You will need pressure-treated lumber for the frame, greenhouse plastic or glass panels for the walls and roof, screws or nails, a drill, a saw, a tape measure, and a level.

3. Measure and Prepare the Frame

Measure the dimensions of your desired greenhouse and mark them on the existing wall or structure. Use a saw to cut the pressure-treated lumber to the appropriate lengths, including the vertical supports, horizontal beams, and roof rafters. Ensure that the frame is sturdy and properly secured to the existing structure.

4. Build the Frame

Assemble the frame using screws or nails to connect the vertical supports and horizontal beams. Ensure that the frame is level and square by using a level and a framing square. Add diagonal bracing to reinforce the structure and provide additional stability.

5. Install the Walls and Roof

Attach the greenhouse plastic or glass panels to the frame using appropriate fasteners. For plastic, use a staple gun or greenhouse clips to secure the panels. If using glass, use glazing clips or silicone to hold the panels in place. Start with the walls and then move on to the roof. Ensure that the panels fit tightly and are properly sealed to prevent drafts and water leakage.

6. Ventilation and Insulation

Install windows or vents in your lean-to greenhouse to provide proper ventilation. This will help regulate temperature and humidity levels, creating an optimal growing environment. Additionally, consider insulating the greenhouse with bubble wrap or greenhouse insulation to retain heat during colder months.

7. Add Shelving and Benches

To optimize space and create functional storage, add shelves and benches inside your lean-to greenhouse. These will provide surfaces for potting, organizing tools, and displaying plants. Use sturdy materials that can withstand moisture and weight.

8. Provide Water and Electricity

Consider installing a water source, such as a hose or irrigation system, inside your lean-to greenhouse for easy watering. Additionally, if you plan to use artificial lighting or electrical devices, consult a professional to ensure proper wiring and electrical safety measures.

9. Maintain and Monitor

Regularly maintain your lean-to greenhouse by monitoring temperature, humidity, and ventilation. Make necessary adjustments and repairs as needed to keep your plants healthy and thriving. Clean the greenhouse periodically to prevent pests and diseases.

Conclusion

Building a wooden lean-to greenhouse allows you to create a controlled and nurturing environment for your plants. By following these steps and taking your time to plan and construct the greenhouse, you can enjoy the benefits of extended growing seasons and a thriving collection of plants. Remember to research the specific needs of your plants regarding temperature, humidity, and sunlight to provide the ideal growing conditions within your greenhouse.

Share:

Begin Your Project with 4x6 Lean to Shed Plans

Begin Your Project with 4x6 Lean to Shed Plans

If you've been longing for additional storage or workspace in your outdoor area, a 4x6 lean to shed can be the perfect solution. Whether you need a place to store gardening tools, outdoor equipment, or create a dedicated hobby space, starting your project with well-designed 4x6 lean to shed plans sets you on the path to success. Here's why you should begin your project with these plans and how they can transform your outdoor space.

1. Efficient Use of Space

A 4x6 lean to shed is specifically designed to optimize space utilization. Its compact footprint allows you to make the most of even the smallest outdoor areas. By starting with well-crafted plans, you ensure that every inch of your shed is utilized effectively, providing ample storage or workspace without overwhelming your yard.

2. Customizable Design

Starting with 4x6 lean to shed plans gives you the flexibility to customize the design to suit your specific needs. You can adapt the plans to include features such as windows for natural light, additional shelving for storage, or a built-in workbench for your projects. This customization ensures that your shed is tailored to your requirements and enhances its functionality.

3. Step-by-Step Instructions

High-quality 4x6 lean to shed plans come with detailed step-by-step instructions, making the construction process easier and more manageable, even for beginners. From the foundation to the roof, you'll have clear guidance on each stage of the project, ensuring that you build a structurally sound and durable shed.

4. Cost Savings

By starting your project with 4x6 lean to shed plans, you can save money on design fees and potential mistakes. The plans provide a comprehensive list of materials and tools needed for the project, helping you estimate costs accurately. Additionally, having a well-designed shed ensures efficient use of materials, minimizing waste and unnecessary expenses.

5. Enhance Outdoor Organization

A 4x6 lean to shed is an excellent way to enhance outdoor organization. With dedicated storage space, you can keep your yard tidy and free from clutter. Store your gardening tools, lawn equipment, and outdoor toys in the shed, creating a more organized and visually appealing outdoor environment.

6. Increase Property Value

Adding a well-designed 4x6 lean to shed to your property can increase its value. Potential buyers appreciate the extra storage or workspace that a shed provides, making your property more appealing and marketable. It's a worthwhile investment that not only enhances your current living situation but also offers long-term benefits if you decide to sell your home in the future.

Embarking on your 4x6 lean to shed project with carefully crafted plans sets you up for success. You can create a functional and visually pleasing outdoor space while enjoying the satisfaction of building something with your own hands. So, grab your plans, gather your tools, and get ready to transform your outdoor area with a 4x6 lean to shed.

Share:

How to Build a Lean-To on the Side of Your House

Lean-To on the Side of Your House

Are you looking for a practical and cost-effective way to add extra space to your home? Building a lean-to on the side of your house can be a fantastic solution. Whether you need a covered area for storing tools and equipment or want to create a cozy outdoor seating area, a lean-to can provide the perfect extension to your living space. In this article, I will guide you through the process of building a lean-to, ensuring a successful project that enhances the functionality and aesthetics of your home.

Step 1: Planning and Design

Before you begin construction, it is essential to plan and design your lean-to. Consider the purpose of the structure and determine the appropriate size and location. Take into account any local building codes or regulations that may affect your project. Sketch out the design, noting the dimensions and materials you will need.

Step 2: Gather the Materials

To build a lean-to, you will need the following materials:

  • Pressure-treated lumber for the frame
  • Roofing material (such as metal sheets or shingles)
  • Plywood for the roof and sides
  • Nails or screws
  • Concrete mix for the footings (if necessary)
  • Tools: measuring tape, circular saw, hammer, drill, level, ladder, and safety equipment

Ensure you have all the necessary materials and tools before starting construction. This will help you work efficiently and avoid unnecessary delays.

Step 3: Prepare the Site

Clear the area where you plan to build the lean-to. Remove any obstacles, rocks, or debris. Level the ground and mark the exact location of the structure. If required, dig footings and pour concrete to provide a solid foundation for your lean-to.

Step 4: Build the Frame

Using the pressure-treated lumber, construct the frame of your lean-to. Begin with the side attached to the house and then build the remaining sides. Ensure the frame is level and secure it firmly to the house using appropriate fasteners. Double-check all measurements and angles to guarantee a sturdy structure.

Step 5: Install the Roof and Sides

Once the frame is in place, install the roof and sides of your lean-to. Use plywood sheets for the roof, ensuring they are securely attached to the frame. Consider adding a slight slope to allow water drainage. For the sides, you can use plywood, lattice panels, or even screens, depending on your preferences and needs. Make sure everything is well-secured and weatherproof.

Step 6: Finishing Touches

Finally, add any finishing touches to enhance the appearance and functionality of your lean-to. You can paint the structure to match your house or apply a weather-resistant sealant to protect the wood. Consider adding lighting, shelves, or hooks to make the space more versatile and convenient.

Congratulations! You have successfully built a lean-to on the side of your house. Now you can enjoy the additional space and take advantage of its numerous uses.

Remember to always prioritize safety during construction. If you are unsure about any step of the process, consult with a professional or seek expert advice.

Share:

Wednesday, June 14, 2023

Inspiring Ideas: Design the Perfect 4x6 Lean to Shed for Your Space

free plans 4x6 Lean to Shed for Your Space

Designing the perfect 4x6 lean to shed requires careful consideration of both functionality and aesthetics. Whether you need extra storage, a workspace, or a creative retreat, your shed can be customized to meet your specific needs. Get inspired and bring your vision to life with these ideas for designing the perfect 4x6 lean to shed for your space.

1. Multi-Functional Layout

Make the most of your limited space by incorporating a multi-functional layout. Combine storage areas with a workbench or create a dedicated area for gardening tools and equipment. By maximizing functionality, you can create a versatile shed that serves multiple purposes without feeling cramped.

2. Vertical Storage Solutions

When working with a smaller footprint, utilizing vertical space is essential. Incorporate shelves, hooks, and wall-mounted organizers to take advantage of the height of your shed. This allows you to store items efficiently and keep the floor area clear for easy movement.

3. Natural Light and Ventilation

Bring in natural light to create a bright and inviting space. Consider adding windows or skylights to maximize daylight and reduce the need for artificial lighting. Additionally, plan for adequate ventilation to keep the shed well-ventilated and prevent musty odors or moisture buildup.

4. Creative Exterior Finishes

Let your shed become a focal point in your outdoor space by applying creative exterior finishes. Choose a color scheme that complements your existing architecture or adds a pop of personality. You can also consider decorative elements such as window boxes, shutters, or trellises to enhance the overall aesthetic appeal.

5. Customized Entryway

The entryway sets the tone for your shed and can be customized to match your style. Consider adding a charming porch, a decorative door, or even a small seating area. This creates an inviting and welcoming space that adds a touch of character to your shed.

6. Green Roof or Living Wall

Add a touch of eco-friendliness and natural beauty to your shed by incorporating a green roof or living wall. A green roof consists of a layer of vegetation that helps with insulation, absorbs rainwater, and provides a habitat for pollinators. Alternatively, a living wall made of plants can serve as a stunning vertical garden.

7. Personalized Décor and Accessories

Make your shed feel like an extension of your home by adding personalized décor and accessories. Hang artwork, install a chalkboard or corkboard for notes and inspiration, and incorporate functional and decorative elements that reflect your style and hobbies.

Remember, the perfect 4x6 lean to shed is one that caters to your specific needs and preferences. Let your imagination soar and incorporate these inspiring ideas to design a shed that is both functional and visually appealing. With a well-designed and personalized space, your 4x6 lean to shed will become a cherished part of your property.

Share:

Tuesday, June 13, 2023

Strong Foundation, Lasting Structure: Expert 4x6 Lean to Shed Plans

Expert 4x6 Lean to Shed Plans

When it comes to building a 4x6 lean to shed, a strong and sturdy foundation is the key to a lasting structure. Expertly designed plans will guide you through the construction process, ensuring that your shed stands the test of time. Let's explore the essential elements of expert 4x6 lean to shed plans that will help you create a strong foundation and a durable structure.

1. Site Preparation

Before constructing your shed, proper site preparation is crucial. Start by clearing the area of any vegetation, rocks, or debris. Level the ground to ensure a flat and stable base for your shed. This step is essential for a solid foundation and overall structural integrity.

2. Foundation Options

Expert shed plans provide various foundation options to suit your specific needs and preferences. Common options include concrete piers, concrete blocks, or skids. Each option has its advantages, such as stability, affordability, or portability. The plans will guide you in choosing the most suitable foundation for your 4x6 lean to shed.

3. Framing and Wall Construction

The framing and wall construction phase is critical for the overall strength of your shed. Expert plans provide detailed instructions for accurately measuring, cutting, and assembling the framing components. From the wall studs to the top and bottom plates, each element is carefully designed to ensure stability and structural integrity.

4. Roof Design and Trusses

The roof design is an important aspect of expert 4x6 lean to shed plans. The plans will provide guidance on the proper roof pitch and design to ensure efficient water runoff and prevent leaks. Additionally, detailed instructions for constructing roof trusses will be included, ensuring a strong and durable roof structure.

5. Quality Materials and Hardware

Expert shed plans emphasize the use of quality materials and hardware. From pressure-treated lumber to corrosion-resistant screws and nails, the plans will specify the appropriate materials for each component of your shed. This attention to detail ensures that your shed is built to withstand the elements and last for years to come.

6. Step-by-Step Instructions

Clear and concise step-by-step instructions are a hallmark of expert 4x6 lean to shed plans. Each phase of the construction process, from foundation to finishing touches, will be outlined in detail. You'll be guided through each step, making it easier to follow and ensuring that no critical steps are missed.

7. Safety Considerations

Expert shed plans prioritize safety throughout the construction process. They will provide safety tips and precautions to ensure that you work in a secure environment. Safety considerations may include wearing protective gear, using tools correctly, and taking necessary precautions when working at heights.

By following expert 4x6 lean to shed plans, you can confidently construct a shed with a strong foundation and lasting structure. The attention to detail, step-by-step instructions, and emphasis on quality materials will ensure that your shed stands strong for years to come, providing a reliable storage solution for your belongings.

Share:

Monday, June 12, 2023

Know Exactly What You Need: Complete 4x6 Lean to Shed Materials List

Complete 4x6 Lean to Shed Materials List

Planning to build a 4x6 lean to shed? To ensure a smooth and efficient construction process, it's essential to have a comprehensive materials list. Knowing exactly what you need in terms of lumber, hardware, and other supplies will help you stay organized and avoid unnecessary trips to the store. Here is a complete materials list for your 4x6 lean to shed project:

1. Lumber

  • 4x4 pressure-treated lumber: X pieces, X feet
  • 2x4 lumber: X pieces, X feet
  • 2x6 lumber: X pieces, X feet
  • 2x8 lumber: X pieces, X feet
  • Plywood sheets (3/4 inch): X sheets

2. Roofing Materials

  • Roofing shingles or metal roofing: X bundles or X square feet
  • Roofing underlayment: X rolls
  • Drip edge: X feet
  • Roofing nails

3. Siding Materials

  • Exterior-grade plywood (1/2 inch): X sheets
  • Wooden siding or vinyl siding: X square feet
  • Siding nails

4. Foundation Materials

  • Concrete piers or concrete blocks: X pieces
  • Pressure-treated 2x6 lumber (for skids): X pieces, X feet
  • Pressure-treated 4x4 lumber (for posts): X pieces, X feet

5. Doors and Windows

  • Exterior-grade door: X units
  • Window frames: X units
  • Glass panes or window inserts: X pieces
  • Door and window hardware

6. Hardware and Fasteners

  • Galvanized screws and nails (various sizes)
  • Brackets, anchors, and connectors
  • Hinges and latches
  • Door handle and lockset

7. Miscellaneous Supplies

  • Construction adhesive
  • Caulk
  • Paint or stain
  • Weatherstripping
  • Roofing sealant
  • Insulation (if needed)

Keep in mind that the quantities listed above are approximate and may vary depending on the specific design and features of your 4x6 lean to shed. It's always a good idea to double-check your measurements and consult the construction plans before purchasing materials.

By having a complete materials list in hand, you can confidently gather all the necessary supplies before starting your project. This ensures a more efficient and enjoyable construction process, leading to a successful outcome for your 4x6 lean to shed.

Share:

Sunday, June 11, 2023

Start Small, Dream Big: Compact 4x6 Lean to Shed Plans

Compact 4x6 Lean to Shed Plans

Looking to add some extra storage space to your backyard? A compact 4x6 lean to shed might be the perfect solution. Even with limited space, you can maximize functionality and organization with well-designed plans. Let's explore how these compact 4x6 lean to shed plans can help you start small and dream big.

1. Assess Your Storage Needs

Before diving into the construction process, assess your storage needs. Determine what items you plan to store in the shed and how much space you require. Consider tools, equipment, gardening supplies, or any other belongings that need a dedicated storage area. This will help you design the shed's interior layout and optimize the available space.

2. Choose the Right Location

Find the perfect spot in your backyard for your 4x6 lean to shed. Look for an area that is easily accessible and suits your needs. Take into account factors such as sunlight exposure, drainage, and proximity to other structures. Choosing the right location ensures convenience and functionality.

3. Optimize Vertical Space

Since you're working with a compact footprint, make the most of the vertical space available in your 4x6 lean to shed. Install shelves, hooks, and hanging systems to store items off the floor and utilize the wall space efficiently. This will help you maximize storage capacity without sacrificing floor area.

4. Incorporate Smart Organization Solutions

Consider incorporating smart organization solutions into your shed design. Utilize storage bins, labeled containers, and wall-mounted organizers to keep everything in order. Make use of pegboards or magnetic strips to hang tools and keep them easily accessible. Efficient organization ensures that you can make the most of the available space.

5. Embrace Natural Light

Add windows or skylights to your 4x6 lean to shed to introduce natural light. This not only makes the space more pleasant but also eliminates the need for artificial lighting during the day. Natural light creates a brighter and more inviting atmosphere in your compact shed.

6. Consider Multi-Functional Design

Explore multi-functional design options to maximize the versatility of your 4x6 lean to shed. For example, incorporate a workbench that can double as a potting station or a foldable table that can be used for various tasks. This allows you to make the most of the available space and adapt it to different needs.

7. Plan for Proper Ventilation

Ensure proper ventilation in your compact shed to prevent moisture buildup and maintain a healthy environment for stored items. Install vents or windows that can be opened to promote airflow. Adequate ventilation helps prevent issues like mold or musty odors.

8. Personalize Your Shed

Add your personal touch to the 4x6 lean to shed. Paint the exterior with your favorite colors, add decorative accents, or incorporate landscaping around the shed to create a cohesive and visually appealing space. Personalization allows you to make the shed an extension of your style and personality.

Remember, starting small doesn't mean you can't dream big. With these compact 4x6 lean to shed plans, you can create a functional and organized storage space that meets your needs. Enjoy the process of building your shed and envision how it will enhance your outdoor space.

Share:

Saturday, June 10, 2023

Build with Confidence: Comprehensive 4x6 Lean to Shed Construction Plans

4x6 Lean to Shed Construction Plans

Are you ready to embark on a rewarding DIY project and build your very own 4x6 lean to shed? With comprehensive construction plans, you can approach the project with confidence and create a durable and functional structure that meets your storage needs. Follow these step-by-step instructions and unleash your inner builder.

1. Gather Your Tools and Materials

Before diving into the construction process, make sure you have all the necessary tools and materials at hand. This may include a tape measure, circular saw, power drill, hammer, level, nails, screws, and the specified lumber and roofing materials. Having everything ready will ensure a smooth workflow.

2. Prepare the Site

Clear the area where you plan to build your 4x6 lean to shed. Remove any obstacles, level the ground, and consider using stakes and string to outline the shed's footprint. Take into account local building codes and regulations regarding setback requirements and property lines.

3. Construct the Foundation

Start by building the foundation for your shed. Depending on your preferences and local requirements, options include concrete piers, concrete slab, or pressure-treated skids. Follow the construction plans for the recommended foundation type and ensure it is level and properly anchored.

4. Frame the Walls

Using the provided measurements and cutting guides, begin framing the walls of your 4x6 lean to shed. This will involve cutting the lumber to size and assembling the wall sections using nails or screws. Ensure the walls are plumb and square before moving on to the next step.

5. Install the Roof Trusses

Follow the plans to construct and install the roof trusses. These support structures provide stability and ensure a strong and secure roof for your shed. Take your time to align and fasten the trusses properly, ensuring they are evenly spaced and securely attached to the walls.

6. Add Roofing and Siding

Once the trusses are in place, it's time to install the roofing materials. Whether you choose shingles, metal sheets, or another option, carefully follow the manufacturer's instructions for installation. Next, add the siding to the walls, ensuring a tight fit and weather-resistant finish.

7. Install Doors and Windows

Add doors and windows to your 4x6 lean to shed for easy access and ventilation. Install the specified door and window frames, ensuring they are properly aligned and secure. Weatherstrip and seal around the openings to prevent drafts and water infiltration.

8. Finish and Customize

Complete your 4x6 lean to shed by adding finishing touches and customizations. This may include painting or staining the exterior, applying a protective sealant, and adding shelves or hooks inside for organizing your belongings. Let your creativity shine as you personalize your shed to suit your needs.

9. Regular Maintenance

To ensure the longevity of your 4x6 lean to shed, perform regular maintenance tasks. Check for any signs of damage, replace worn-out roofing materials or siding, and keep the shed clean and free from debris. Regularly inspect and repair any areas that may have been affected by weather or wear.

With comprehensive construction plans, you can confidently build your own 4x6 lean to shed and enjoy the satisfaction of a successful DIY project. Embrace the process, take your time and follow the detailed instructions provided in the construction plans. Remember to prioritize safety throughout the project by wearing appropriate protective gear and using tools correctly.

Seek assistance from a friend or family member if needed, as having an extra set of hands can make certain tasks easier and more efficient. Don't hesitate to consult the plans or research online resources if you encounter any challenges or have questions along the way.

Building your 4x6 lean to shed is not only a fulfilling endeavor but also a practical solution for organizing your outdoor space. It provides a dedicated storage area for gardening tools, equipment, and other items, helping you maintain a clutter-free environment.

Before you begin construction, it's essential to check with your local authorities or homeowner's association to ensure compliance with any permits or regulations required for shed construction in your area.

By following the comprehensive 4x6 lean to shed construction plans, you can confidently tackle each step of the process, from site preparation to final customization. Enjoy the journey of building your shed and take pride in the functional and practical addition to your property.

Share:

Friday, June 9, 2023

Weatherproof Your Belongings: Reliable 4x6 Lean to Shed Roof Plans

Weatherproof Your Belongings  Reliable 4x6 Lean to Shed Roof Plans

When it comes to building a 4x6 lean to shed, one of the most critical aspects is the roof. A well-designed and properly constructed roof ensures the protection of your belongings from the elements. Follow these reliable 4x6 lean to shed roof plans to create a weatherproof and durable structure.

1. Choose the Right Roofing Material

Selecting the appropriate roofing material is crucial for a reliable and long-lasting shed roof. Common options include asphalt shingles, metal sheets, or corrugated panels. Consider factors such as durability, cost, and aesthetic appeal when making your choice. Opt for high-quality materials that are designed to withstand the local weather conditions.

2. Calculate the Roof Pitch

Determine the roof pitch for your 4x6 lean to shed. The roof pitch refers to the slope or angle of the roof. A steeper pitch helps with water runoff, preventing pooling and potential leaks. Follow the recommended pitch specified in the construction plans to ensure proper water drainage.

3. Install Roof Trusses

Construct and install roof trusses according to the provided measurements and guidelines. Trusses provide structural support and stability to the roof. Ensure that the trusses are evenly spaced, securely fastened, and aligned with the walls of your shed.

4. Add Roofing Underlayment

Before installing the roofing material, add a layer of roofing underlayment to provide an additional barrier against moisture. This underlayment helps protect the shed from potential leaks and enhances the roof's weatherproofing capabilities. Follow the manufacturer's instructions for proper installation.

5. Install the Roofing Material

Carefully install the selected roofing material according to the manufacturer's guidelines. Whether you are using asphalt shingles, metal sheets, or another type of roofing, follow the recommended installation techniques. Pay attention to proper overlapping, fastening, and sealing to ensure a tight and secure roof surface.

6. Seal Roofing Penetrations

Inspect the roof for any penetrations such as vents, chimneys, or skylights. Properly seal around these areas to prevent water infiltration. Use appropriate roofing sealants or flashing materials to create a watertight barrier. This step is crucial for maintaining the shed's weather resistance.

7. Maintain and Inspect Regularly

To ensure the ongoing reliability of your 4x6 lean to shed roof, perform regular maintenance and inspections. Clear any debris or leaves that may accumulate on the roof surface. Check for damaged or missing shingles or panels and replace them promptly. Regular inspections allow you to address any issues early on, preventing further damage or leaks.

By following these reliable 4x6 lean to shed roof plans, you can create a robust and weatherproof structure that will protect your belongings for years to come. Invest in high-quality materials, pay attention to proper installation techniques, and perform regular maintenance to keep your shed roof in excellent condition.

Share:

Thursday, June 8, 2023

Functional and Stylish: Design Your 4x6 Lean to Shed with a Door

Functional and Stylish  Design Your 4x6 Lean to Shed with a Door

When it comes to designing your 4x6 lean to shed, one crucial element that combines functionality and style is the door. Choosing the right door for your shed not only enhances its overall appearance but also provides convenient access and security for your stored items. Let's explore some key considerations and design options for incorporating a door into your 4x6 lean to shed.

Considerations for Choosing a Shed Door

Before diving into the design options, here are a few considerations to keep in mind when selecting a door for your 4x6 lean to shed:

  • Size: Ensure that the door size is proportionate to the shed's dimensions, allowing easy entry and exit while accommodating larger items if needed.
  • Material: Choose a door material that suits your style preferences, climate conditions, and desired level of maintenance. Common options include wood, metal, and fiberglass.
  • Security: Consider adding a sturdy lock or latch mechanism to keep your shed secure. Opt for reinforced hinges and durable hardware to enhance the door's strength and longevity.
  • Accessibility: If you plan to store large equipment or machinery in your shed, consider a wider door or double doors to facilitate easy access.

Design Options for Your Shed Door

Now, let's explore some design options to make your 4x6 lean to shed door a standout feature:

1. Traditional Hinged Door:

A classic hinged door adds timeless charm to your shed. Opt for a wooden door with decorative accents such as windows, transoms, or a custom-carved design. This option blends well with various architectural styles and offers a warm and inviting entrance.

2. Sliding Barn Door:

For a rustic or farmhouse aesthetic, consider a sliding barn door. This type of door operates on a track system and adds character to your shed. Choose reclaimed wood or weathered finishes to enhance the rustic appeal.

3. French Doors:

If you desire an elegant and airy look, French doors are an excellent choice. These double doors feature glass panels that allow natural light to flood your shed's interior while creating a stylish and welcoming entryway.

4. Roll-Up Door:

For practicality and convenience, a roll-up door provides easy access to your shed. This type of door is commonly seen in commercial settings but can be a functional choice for your 4x6 lean to shed if you frequently need to move larger items in and out.

5. Contemporary Metal Door:

If you prefer a modern and sleek design, a metal door can add an industrial touch to your shed. Opt for stainless steel or aluminum doors with clean lines and minimalistic hardware to achieve a contemporary look.

Combine Style and Functionality

By carefully selecting the right door for your 4x6 lean to shed, you can create a space that seamlessly combines style and functionality. Consider your personal preferences, the shed's overall design, and the practical needs of accessing and securing your stored items.

Remember to follow any local building codes and regulations regarding shed doors, including requirements for size, materials, and security measures.

Design your 4x6 lean to shed with a door that reflects your unique style and enhances the overall aesthetic of your outdoor space. Whether you prefer a traditional hinged door, a rustic sliding barn door, elegant French doors, a practical roll-up door, or a contemporary metal door, there's a design option that will suit your taste and meet your functional requirements.

When installing the door, ensure proper alignment, secure mounting, and weatherproofing to protect your shed's contents from the elements. Consider adding weatherstripping or insulation to enhance energy efficiency and keep the interior of your shed comfortable.

In addition to the door itself, you can enhance the functionality and style of your 4x6 lean to shed by incorporating additional features such as windows for natural light and ventilation, a porch or awning to create a welcoming entryway, or decorative elements that complement your overall design theme.

Remember to maintain your shed door regularly by checking for any signs of damage, lubricating hinges and moving parts, and replacing any worn-out components to ensure optimal functionality and longevity.

With a well-designed and properly installed door, your 4x6 lean to shed will not only serve as a practical storage solution but also become a visually appealing and functional extension of your outdoor space.

So, take the time to select the perfect door for your 4x6 lean to shed, considering factors such as size, material, security, and accessibility. Let your shed door be a reflection of your style while providing easy access and protection for your stored items.

Transform your shed into a space that combines functionality and style, and enjoy the convenience and satisfaction of a well-designed 4x6 lean to shed with a door that truly enhances its overall appeal.
Share:

Wednesday, June 7, 2023

Budget-Friendly 4x6 Lean to Shed Plans: Save Big on Materials

Budget-Friendly 4x6 Lean to Shed Plans

Building a 4x6 lean to shed doesn't have to break the bank. With the right approach and careful planning, you can create a functional and stylish shed while saving money on materials. Follow these budget-friendly 4x6 lean to shed plans and start your project without compromising on quality or design.

1. Determine Your Shed Requirements

Before purchasing materials, assess your storage needs and determine the essential features for your 4x6 lean to shed. Consider the items you plan to store, the shed's purpose, and any specific design elements you desire. This will help you avoid unnecessary expenses and focus on the materials that matter most.

2. Research and Compare Prices

Take the time to research and compare prices from different suppliers and hardware stores. Look for special promotions, discounts, or clearance sales on the materials you need. Online marketplaces and local classified ads can also be great sources for affordable building materials.

3. Opt for Cost-Effective Building Materials

Consider using cost-effective building materials that provide good quality and durability. Here are a few options to help you save on costs:

  • Pressure-Treated Lumber: Pressure-treated lumber is an affordable choice for the structural components of your shed. It offers resistance to rot, insects, and decay, ensuring the longevity of your shed.
  • Recycled or Reclaimed Materials: Explore the possibility of using recycled or reclaimed materials for your shed construction. This not only reduces costs but also adds a unique and environmentally friendly touch to your project.
  • Economical Roofing: Look for cost-effective roofing materials such as asphalt shingles or metal sheets. These options provide adequate protection for your shed without breaking the bank.
  • Alternative Flooring: Consider alternative flooring options like gravel, concrete, or recycled rubber mats. These materials are often more budget-friendly compared to traditional wood flooring.

4. Plan Efficient Material Usage

To minimize waste and optimize material usage, plan your cuts and measurements carefully. Optimize board lengths to reduce the number of cuts and minimize leftover scraps. Proper planning ensures that you make the most of the materials you purchase.

5. DIY and Repurpose

Embrace your DIY skills and save on labor costs by building the shed yourself. With detailed plans and guidance, you can successfully tackle the construction process and enjoy the satisfaction of a project well done. Additionally, repurpose materials you may already have on hand, such as leftover lumber, screws, or hardware, to further reduce costs.

6. Seek Advice from Experts

Consult with experienced builders, local hardware store professionals, or online communities for tips and advice on cost-saving measures. They may have valuable insights or alternative suggestions for affordable materials and construction techniques.

By following these budget-friendly 4x6 lean to shed plans, you can create a high-quality shed without stretching your budget. Remember to prioritize safety, invest in essential materials, and ensure proper construction techniques for a durable and functional structure.

Start your shed-building journey today and enjoy the benefits of a cost-effective and well-designed 4x6 lean to shed!

Share:

Tuesday, June 6, 2023

Master Your DIY Skills with Detailed 4x6 Lean to Shed Instructions

Master Your DIY Skills with Detailed 4x6 Lean to Shed Instructions

Are you ready to take your DIY skills to the next level? Building a 4x6 lean to shed is an excellent project to enhance your craftsmanship while providing a practical storage solution for your outdoor space. With our detailed instructions, you can master the art of shed construction and create a beautiful and functional addition to your property.

1. Gather the Materials

Start by gathering all the necessary materials for your 4x6 lean to shed. This includes lumber, roofing materials, nails, screws, and any other components specified in the materials list. Having everything prepared before you begin will ensure a smoother construction process.

2. Prepare the Site

Clear and level the area where you plan to build your shed. Remove any debris, rocks, or vegetation. Ensure that the ground is stable and properly compacted. Consider using concrete footings or pavers for a solid foundation.

3. Build the Frame

Follow the detailed instructions to construct the frame of your 4x6 lean to shed. This will involve cutting the lumber to the specified measurements and assembling the walls, roof trusses, and floor. Use a level to ensure everything is straight and plumb.

4. Install Roofing and Siding

Once the frame is complete, it's time to install the roofing materials, such as shingles or metal sheets. Follow the manufacturer's instructions for the specific roofing material you choose. Next, add the siding to the walls, ensuring a secure and weather-resistant finish.

5. Add Doors and Windows

Install the doors and windows according to the instructions. Make sure they are properly aligned, weather-sealed, and secure. This step will enhance the functionality and aesthetics of your 4x6 lean to shed.

6. Finishing Touches

Complete your shed by adding finishing touches. This may include painting or staining the exterior, applying a protective sealant, and adding any additional features or accessories you desire. Take your time to ensure a professional-looking result.

7. Maintain Your Shed

Maintaining your 4x6 lean to shed is essential for its longevity. Regularly inspect the shed for any signs of damage or wear, especially after harsh weather conditions. Replace any damaged roofing materials or siding promptly to prevent further issues.

By following these detailed instructions, you can confidently build your own 4x6 lean to shed and develop your DIY skills. Remember to prioritize safety throughout the construction process, wear appropriate protective gear, and consult local building codes and regulations.

Start your shed-building journey today and unleash your creativity and craftsmanship. With each project, you'll gain valuable experience and satisfaction in creating something with your own hands.

Share:

Monday, June 5, 2023

Maximize Space: Innovative 4x6 Lean to Storage Shed Ideas

Innovative 4x6 Lean to Storage Shed Ideas

Are you looking for creative ways to maximize the storage space in your yard? Look no further! Our innovative 4x6 lean to storage shed ideas will help you make the most of every square inch, providing efficient and organized storage solutions for all your needs.

1. Vertical Storage Solutions

When space is limited, it's essential to think vertically. Install vertical shelving units or pegboards on the walls of your 4x6 lean to shed. This allows you to store items off the floor, utilizing the height of the shed effectively. You can hang tools, gardening equipment, and even bicycles to keep them easily accessible while freeing up valuable floor space.

2. Customized Storage Compartments

Create custom storage compartments tailored to your specific needs. Consider adding hooks, racks, and compartments for smaller items such as hand tools, gloves, or seed packets. By having designated spaces for each item, you'll maintain a clutter-free shed and easily locate what you need.

3. Overhead Storage

Make use of the overhead space in your 4x6 lean to shed by installing overhead storage racks or suspended shelves. These provide a perfect solution for storing items that are used less frequently, such as seasonal decorations or camping gear. Be sure to secure the overhead storage properly to ensure safety and stability.

4. Multi-Purpose Workbench

Incorporate a sturdy workbench into your shed design. A multi-purpose workbench serves as a workspace for various projects and provides additional storage opportunities. Include drawers or cabinets underneath the workbench to store tools, hardware, and other essentials, keeping them easily accessible while maximizing space efficiency.

5. Utilize the Shed Doors

Don't overlook the potential of the shed doors as storage space. Install hooks or racks on the inner side of the doors to hang frequently used items like gardening gloves, hats, or small hand tools. This clever use of space keeps these items within reach without occupying valuable interior space.

Enjoy an Organized and Functional Shed

By implementing these innovative 4x6 lean to storage shed ideas, you can transform your shed into an organized and functional space that maximizes storage capacity. Remember to customize the ideas to suit your specific needs and optimize the layout based on your available space.

When constructing or modifying your shed, always prioritize safety and ensure proper installation of storage solutions. Consider consulting professionals or experienced builders if needed.

Start implementing these innovative ideas in your 4x6 lean to storage shed and enjoy the benefits of a well-organized and efficient storage space in your yard!

Share:

Sunday, June 4, 2023

Effortless Construction: Simplified 4x6 Lean to Shed Plans

Simplified 4x6 Lean to Shed Plans

Are you eager to build your own 4x6 lean to shed but feeling overwhelmed by complex plans and intricate instructions? We understand that not everyone has extensive building experience or the time to decipher complicated blueprints. That's why we're thrilled to offer you simplified 4x6 lean to shed plans that make the construction process effortless and enjoyable.

The Beauty of Simplified Plans

Our simplified 4x6 lean to shed plans are designed with your convenience in mind. Here's how they make shed construction a breeze:

  • Clear and Concise Instructions: We have distilled the construction process into simple, step-by-step instructions that are easy to follow. No technical jargon or confusing terminology. Just straightforward guidance that will keep you on track from start to finish.
  • Minimalist Design: We have stripped away unnecessary complexities, focusing on the essential elements of the shed. This minimalist approach ensures that you can complete the construction without unnecessary complications or extra materials.
  • Visual Illustrations: Visual aids play a crucial role in our simplified plans. We provide clear diagrams and illustrations that visually demonstrate each construction step. You'll have a visual reference to guide you along the way, making the process even more intuitive.
  • Streamlined Material List: Our simplified plans include a concise material list, specifying only the essential materials you'll need. This saves you time, money, and effort by eliminating unnecessary trips to the hardware store and ensuring you have everything required to complete your shed.

Effortless Construction, Stunning Results

Building your 4x6 lean to shed doesn't have to be a daunting task. With our simplified plans, you can enjoy a seamless construction experience while achieving stunning results. Imagine having a functional and stylish shed in your backyard without the stress and complexity usually associated with building projects.

Remember to consider the location of your shed, prepare the site, and comply with any local building regulations. Safety should always be a priority, so take necessary precautions and use the appropriate protective gear throughout the construction process.

Download our simplified 4x6 lean to shed plans today and embark on a stress-free journey to creating the perfect storage space for your outdoor needs. Experience the satisfaction of building something with your own hands and enjoy the benefits of a well-designed and organized shed.

Share: