Saturday, January 10, 2026

Lean To Shed Plans: The Smart, Space-Saving Solution Built by Experts


After years of designing, building, and consulting on outdoor structures, I can say with confidence that lean to shed plans are one of the most underrated yet powerful solutions for modern homeowners. They are simple, efficient, affordable, and incredibly versatile. When designed correctly, a lean to shed can outperform larger, more complex structures—without wasting space or budget.

This article is written from real-world experience. No hype. No shortcuts. Just practical, expert-backed guidance to help you understand why lean to shed plans are worth your time, and how the right plan can save you money, effort, and long-term regret.

What Is a Lean To Shed?

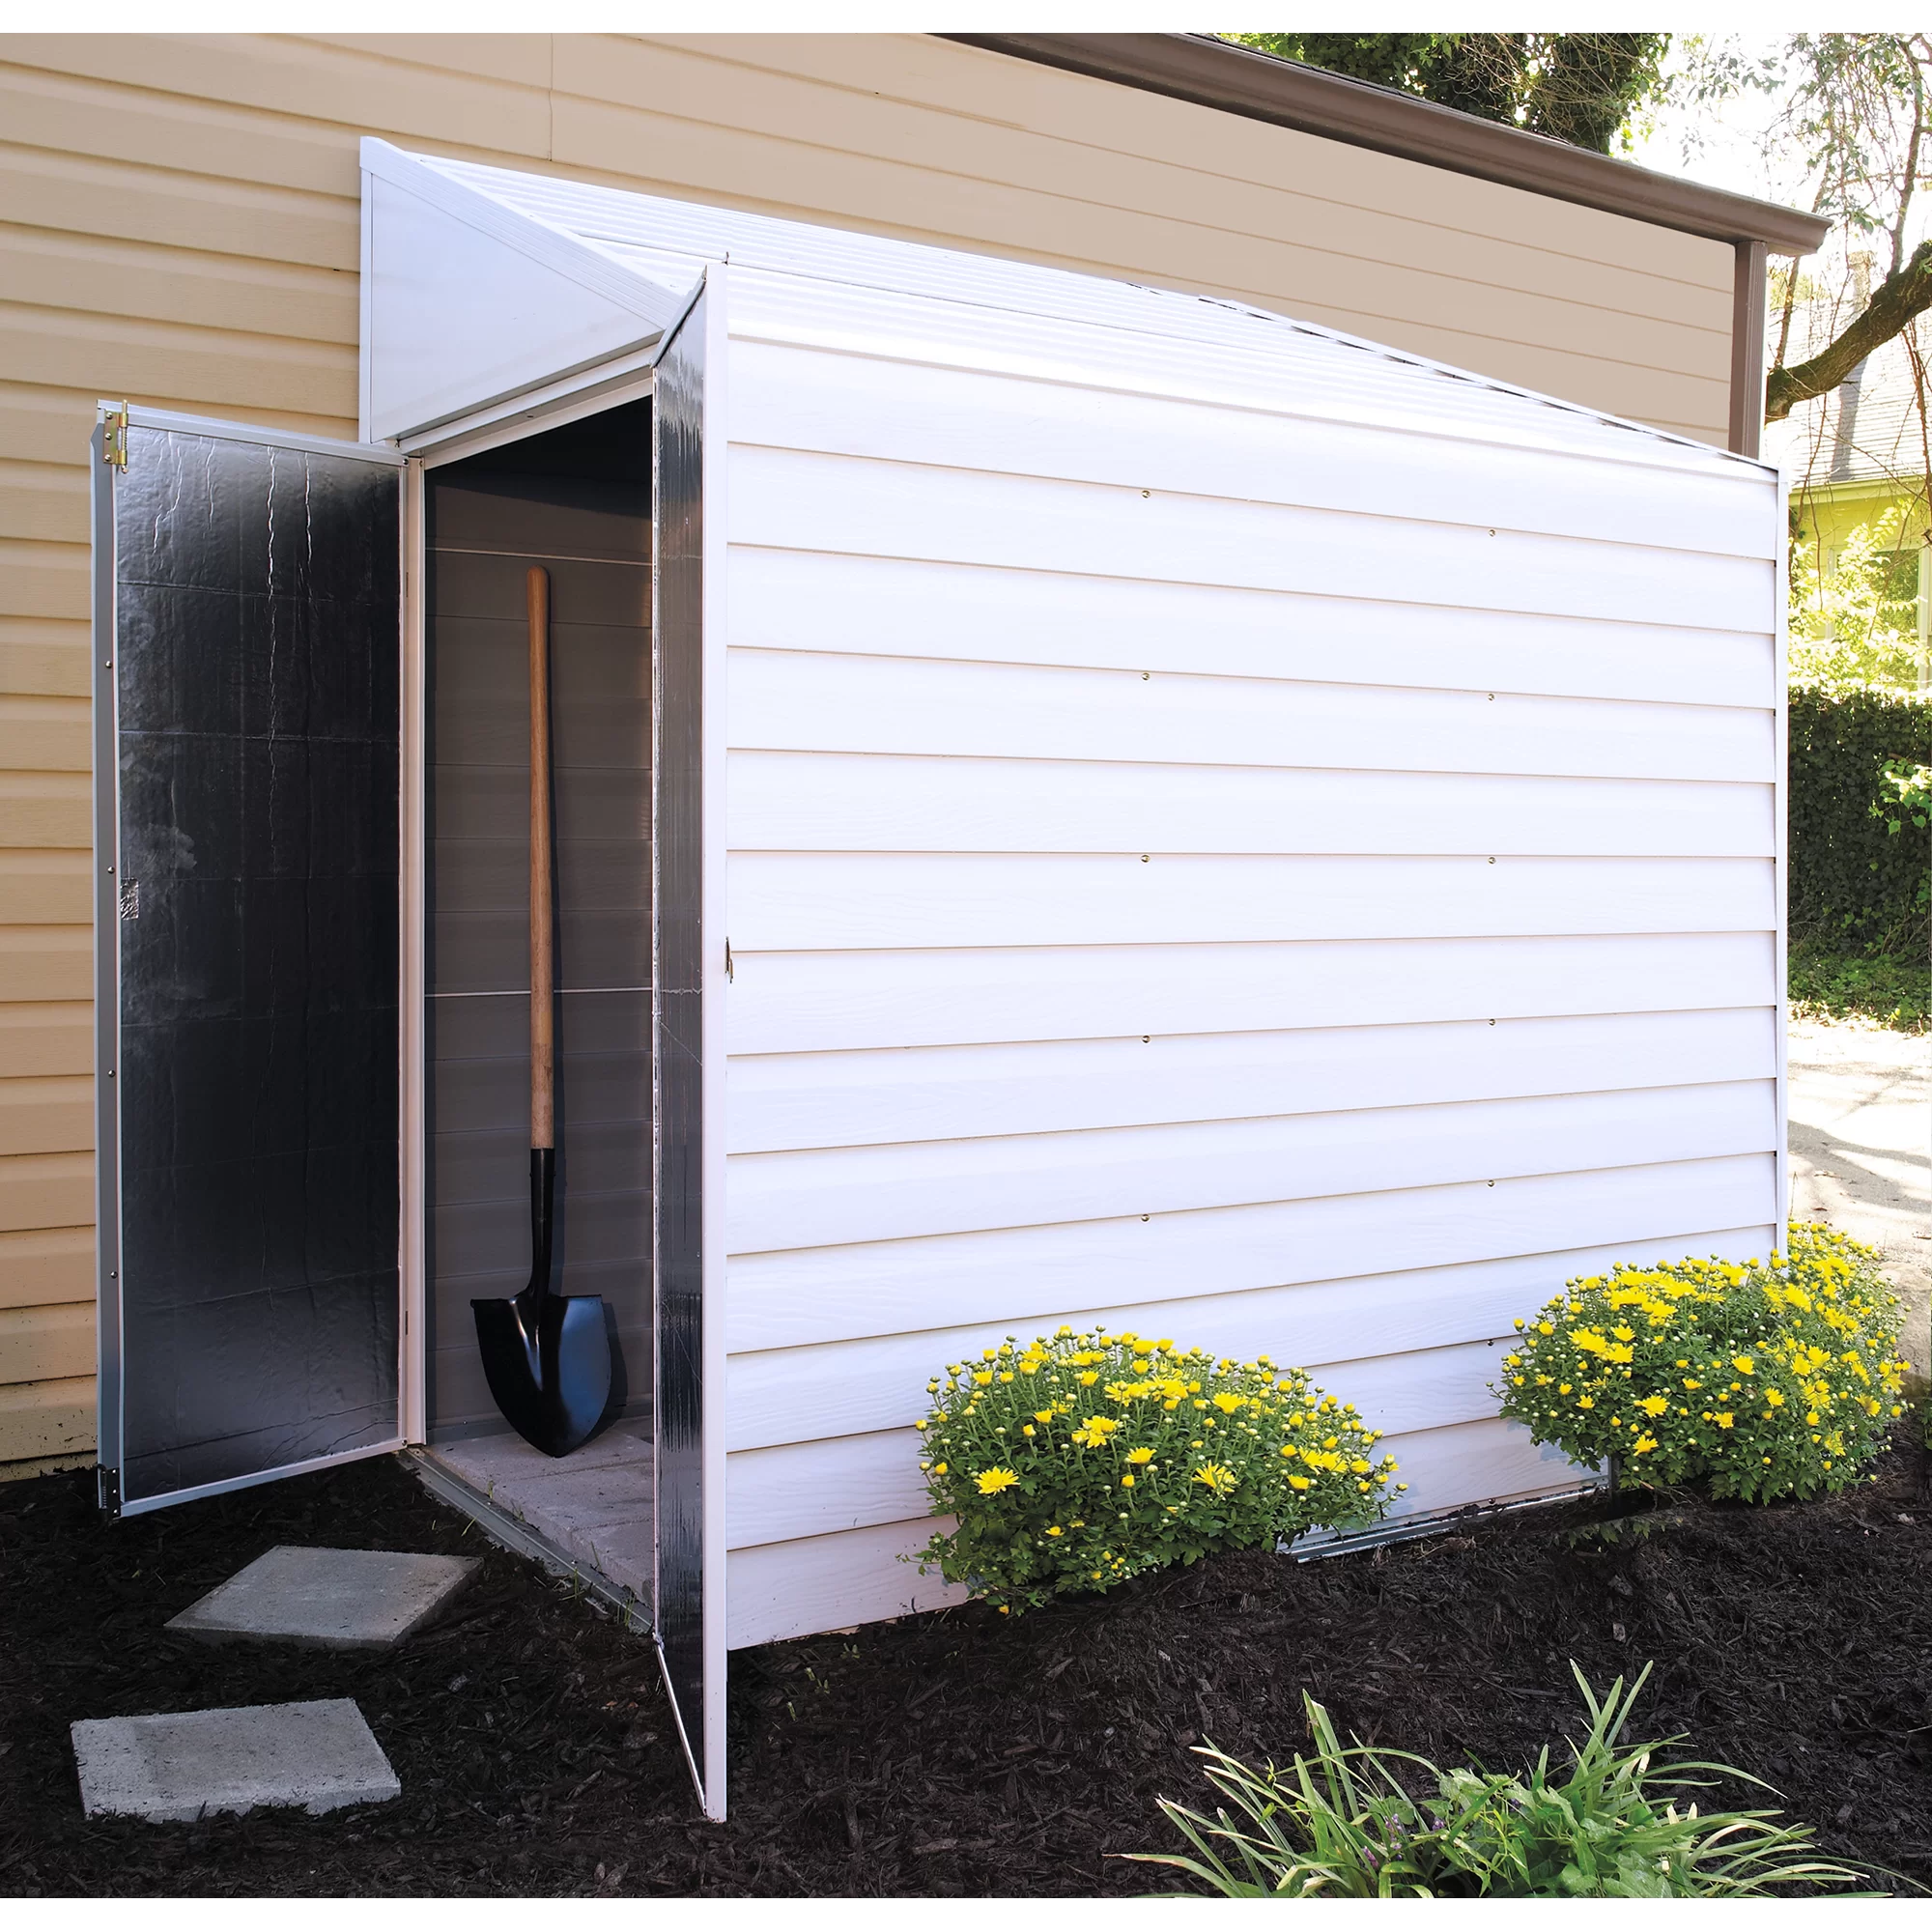
A lean to shed is a single-slope structure that “leans” against another building or stands alone with a roof sloping in one direction. Unlike gable or gambrel sheds, a lean to shed has fewer materials, fewer cuts, and fewer structural complications.

From an expert standpoint, this simplicity is exactly what makes it powerful. Less complexity means fewer mistakes, lower cost, and faster construction—all while maintaining structural integrity when built properly.

Why Lean To Shed Plans Are Gaining Popularity

In recent years, I’ve seen a sharp increase in demand for lean to shed plans. The reason is simple: people want practical solutions, not oversized projects that drain time and money.

Lean to sheds are ideal for tight spaces. They fit perfectly along fences, walls, garages, barns, or property edges. If you’re dealing with zoning limits, uneven land, or limited backyard space, a lean to shed plan often solves problems that traditional shed designs cannot.

Homeowners also appreciate how clean and modern these sheds look. The minimalist roofline blends well with contemporary homes, workshops, and agricultural buildings.

The Real Advantages of Lean To Shed Plans

From a professional builder’s perspective, lean to shed plans offer several clear advantages.

First, they are cost-efficient. A single-slope roof uses fewer rafters, less roofing material, and simpler framing. This alone can reduce total construction costs significantly.

Second, they are beginner-friendly. If you’re a DIY builder, lean to shed plans are far easier to follow than complex multi-roof designs. Fewer angles mean fewer chances to make expensive mistakes.

Third, they are highly adaptable. Lean to sheds can be small tool sheds, large equipment shelters, firewood storage, workshops, or even home offices when insulated and finished properly.

Expert-Approved Uses for Lean To Sheds

One of the biggest misconceptions is that lean to sheds are “limited” structures. In practice, I’ve seen them outperform standard sheds in many applications.

Common expert-recommended uses include:

- Garden and tool storage - Lawn mower and equipment shelters - Firewood storage with excellent airflow - Workshop extensions - Livestock feed storage - Motorcycle or bicycle parking - Home gym or hobby space

Because the roof slopes in one direction, water drainage is excellent, making lean to sheds ideal for rainy climates.

Key Elements of a High-Quality Lean To Shed Plan

Not all lean to shed plans are created equal. From experience, the difference between a long-lasting shed and a problem structure often comes down to planning details.

A professional lean to shed plan should clearly include:

- Accurate dimensions and material lists - Proper roof pitch calculations - Strong wall framing specifications - Load-bearing details for snow or wind - Foundation recommendations - Door and window placement guidance

If a plan skips these details, it’s not a plan—it’s a sketch. Serious builders avoid vague instructions.

Foundation Choices: Expert Recommendations

One advantage of lean to shed plans is foundation flexibility. Depending on size and purpose, you can choose from gravel pads, concrete slabs, concrete piers, or pressure-treated skids.

For lightweight storage sheds, gravel pads perform well and allow drainage. For workshops or heavy equipment, a concrete slab is often the best long-term solution.

From a structural standpoint, foundation quality directly impacts shed lifespan. This is not the place to cut corners.

Roof Design: The Heart of Lean To Shed Plans

The roof is the defining feature of any lean to shed. A properly designed slope ensures water runoff, prevents leaks, and improves durability.

As an expert, I always recommend metal roofing or architectural shingles, depending on climate. Metal roofs excel in durability and low maintenance, while shingles may match residential aesthetics better.

Ventilation should never be ignored. Even a simple vent at the high end of the roof can dramatically improve airflow and prevent moisture buildup.

Customization Options That Add Real Value

One reason lean to shed plans are so popular among professionals is customization potential.

You can easily add:

- Double doors for equipment - Skylights or clerestory windows - Interior shelving systems - Electrical wiring and lighting - Insulation for year-round use

Lean to sheds also expand well. You can extend the length later without redesigning the entire structure, which is rarely possible with traditional sheds.

Lean To Shed Plans vs. Traditional Shed Plans

From a cost-benefit analysis, lean to shed plans often win.

Traditional sheds require more lumber, more roofing, and more labor. Lean to sheds achieve the same function using fewer resources.

For homeowners who value efficiency, this makes lean to shed plans a smarter long-term choice.

Common Mistakes to Avoid

Even the best plan can fail if executed poorly. Based on field experience, these are the most common mistakes:

- Using undersized lumber - Ignoring roof pitch requirements - Poor drainage planning - Skipping anchoring and bracing - Failing to check local building codes

A quality lean to shed plan addresses these risks upfront.

Final Expert Opinion

Lean to shed plans represent smart building at its best. They are efficient, adaptable, cost-effective, and structurally sound when done right.

If you want a shed that works with your space instead of fighting it, a lean to shed is the answer. With the right plan, you’re not just building a shed—you’re creating a functional extension of your property that will serve you for years.

As an expert, I strongly recommend lean to shed plans for anyone who values simplicity, durability, and intelligent design. When built correctly, they prove that smarter structures don’t need to be bigger—just better planned.

Share:

The Ultimate Guide to a 16x40 Shed: Space, Strength, and Smart Investment

The Ultimate Guide to a 16x40 Shed: Space, Strength, and Smart Investment

As someone who has spent years designing, building, and advising on outdoor structures, I can confidently say that a 16x40 shed is not just a shed it’s a strategic investment. This size hits a rare sweet spot: large enough to handle serious storage or workspace needs, yet still practical for residential and light commercial use.

Whether you’re a homeowner, a DIY enthusiast, or a small business owner, a 16x40 shed offers flexibility that smaller sheds simply can’t match. In this article, I’ll walk you through why this size is so powerful, how it can be used, and what to consider before building or buying one.

Why Choose a 16x40 Shed?

The first thing to understand is scale. A 16x40 shed provides 640 square feet of usable space. That’s larger than many studio apartments. From an expert perspective, this footprint allows you to design zones within the shed storage, workspace, and even living or office areas—without feeling cramped.

Unlike smaller sheds that quickly become cluttered, a 16x40 shed gives you room to grow. You can store equipment today and convert part of it into a workshop tomorrow without tearing everything apart.

Versatile Uses That Go Beyond Storage

Many people initially look at a 16x40 shed for storage, and it excels at that. Lawn equipment, motorcycles, ATVs, tools, seasonal items—all can be organized properly with room to spare.

But where this shed truly shines is versatility. I’ve seen 16x40 sheds successfully used as:

- Full woodworking or metal workshops - Home-based business spaces - Agricultural equipment shelters - Hunting cabins or weekend retreats - Home gyms or creative studios

With proper insulation and finishing, this size can even function as a guest house or tiny home-style structure, depending on local regulations.


16x40 shed

Design Flexibility and Customization

From a construction standpoint, the 16x40 size is ideal for customization. You can easily add multiple doors, roll-up garage doors, windows, loft storage, or even partition walls.

Roof styles such as gable, gambrel, or metal roofs work exceptionally well with this footprint. A gambrel roof, for example, can significantly increase overhead storage, making the shed feel even larger.

Experts often recommend this size for clients who want a shed that can evolve over time. You might start with a basic shell and later add electrical wiring, insulation, shelving, or climate control.

Structural Strength and Longevity

A well-built 16x40 shed is designed for durability. Because of its length, proper framing and foundation are critical and when done right, the structure is extremely strong.

In my professional experience, sheds of this size benefit greatly from reinforced flooring, thicker joists, and quality siding materials. This ensures the shed can handle heavy equipment, vehicles, or machinery without sagging or long-term damage.

When built with pressure-treated lumber and weather-resistant materials, a 16x40 shed can last decades with minimal maintenance.

Cost vs. Value: A Smart Long-Term Decision

It’s true that a 16x40 shed costs more upfront than smaller options. However, looking at cost per square foot, it often delivers better value. You’re paying less per usable foot while gaining significantly more functionality.

From an expert investment perspective, this size also adds real property value. Buyers see a large, well-built shed as a bonus structure—not just a storage box. If you ever sell your property, a 16x40 shed can be a strong selling point.

Additionally, choosing a shed this size upfront can save money long-term. Many people outgrow smaller sheds and end up replacing them. Starting with a 16x40 eliminates that problem entirely.

Important Considerations Before You Build or Buy

Before committing, there are a few professional considerations to keep in mind. First, check local zoning and permit requirements. A structure this size may require approval.

Second, plan your foundation carefully. Concrete slabs, gravel pads, or pier foundations all work, but the choice should match your intended use.

Finally, think ahead. Even if you only need storage today, design the shed with future upgrades in mind. Adding extra windows or stronger flooring now is far cheaper than modifying it later.

Final Thoughts from an Expert

A 16x40 shed is not a casual purchase it’s a commitment to space, functionality, and long-term utility. From my experience, this size is ideal for people who want freedom: freedom to build, store, create, and adapt.

If you want a shed that won’t limit you in a year or two, the 16x40 shed is one of the smartest choices you can make. Built correctly, it becomes more than a shed—it becomes a cornerstone of how you use your property.

Suggested Tags: 16x40 shed, large storage shed, backyard shed ideas, workshop shed, outdoor building

Share:

Tuesday, June 20, 2023

How to Build a Lean-To Off a Metal Shed

How to Build a Lean-To Off a Metal Shed

Adding a lean-to extension to your existing metal shed can significantly increase your storage space and provide additional functionality. Whether you need extra room for gardening tools, equipment, or workspace, a lean-to off a metal shed offers a cost-effective and efficient solution. In this article, I will guide you through the process of building a lean-to extension onto your metal shed, allowing you to maximize the utility of your outdoor storage area.

Step 1: Plan and Design

The first step in building a lean-to off a metal shed is to plan and design your extension. Determine the size and dimensions of the lean-to based on your storage needs and the available space around your metal shed. Consider the purpose of the extension and whether it will be used for storage, workspace, or as a sheltered area. Sketch out your design, including measurements and details, to ensure a smooth construction process.

Step 2: Gather the Materials

Before you begin construction, gather all the necessary materials for building the lean-to extension. Here's a list of the items you'll typically need:

  • Pressure-treated lumber for the frame
  • Metal roofing sheets or other suitable roofing material
  • Screws or bolts for securing the structure
  • Tools: measuring tape, circular saw, drill, level, ladder, and safety equipment

Make sure to have all the required materials on hand before starting the construction process to avoid delays.

Step 3: Prepare the Area

Clean the area where the lean-to will be attached to the metal shed. Remove any debris or obstructions and ensure the ground is level. This will provide a stable foundation for your lean-to extension.

Step 4: Build the Frame

Begin by constructing the frame of the lean-to extension. Use pressure-treated lumber to build the posts and beams according to your design. Attach the frame securely to the metal shed using screws or bolts. Ensure the frame is level and aligned properly to guarantee stability and structural integrity.

Step 5: Install the Roofing

Once the frame is in place, it's time to install the roofing material. Metal roofing sheets are a popular choice due to their durability and ease of installation. However, you can use other suitable roofing materials as well. Ensure the roofing material overlaps with the existing shed roof to prevent water leakage. Secure the roofing sheets to the frame using screws or bolts, making sure they are tightly fastened.

Step 6: Add Finishing Touches

To complete the construction of your lean-to extension, add any finishing touches that will enhance its functionality and aesthetics. Consider adding walls or screens to enclose the sides if desired. Install doors or access points for easy entry and exit. Add shelves, hooks, or storage solutions to maximize the organization of your new storage space.

Remember to prioritize safety throughout the construction process. If you are unsure about any step or aspect of the project, consult with a professional or seek expert advice.

Congratulations! You have successfully built a lean-to extension off your metal shed, providing valuable additional storage and workspace.

Share:

Monday, June 19, 2023

How to Build a Walk-Through Lean-To Shed

How to Build a Walk-Through Lean-To Shed

A walk-through lean-to shed is a versatile and convenient outdoor structure that provides storage space while also offering a covered walkway. It can serve as a sheltered pathway from one area of your property to another, while also providing a practical storage solution. Whether you need a place to store gardening tools, bicycles, or other items, a walk-through lean-to shed can be a valuable addition. In this article, I will guide you through the process of building a walk-through lean-to shed, allowing you to create a functional and accessible outdoor space.

Step 1: Determine the Size and Location

Begin by determining the size and location of your walk-through lean-to shed. Consider the available space on your property and choose a location that allows for easy access and a convenient walkway. Measure the length, width, and height of the shed, taking into account the items you plan to store. Make sure to comply with any local building codes or regulations.

Step 2: Gather the Materials

Before you start building, gather all the necessary materials for your walk-through lean-to shed. Here's a list of the items you'll typically need:

  • Pressure-treated lumber for the frame and supports
  • Plywood or oriented strand board (OSB) for the walls and roof
  • Roofing material (such as metal sheets or shingles)
  • Nails or screws
  • Door hinges and latch
  • Tools: measuring tape, circular saw, hammer, drill, level, ladder, and safety equipment

Ensure you have all the necessary materials on hand before you begin construction to avoid unnecessary delays.

Step 3: Build the Frame

Start by constructing the frame of your walk-through lean-to shed. Begin with the two end walls, ensuring they are plumb and securely fastened. Then, install the roof trusses, evenly spaced and securely connected to the end walls. Double-check all measurements and ensure the frame is level and stable.

Step 4: Install Walls and Roof

Attach the plywood or OSB sheets to the frame to form the walls and roof of your walk-through lean-to shed. Ensure they are securely fastened and provide a weatherproof barrier. Cut openings for the walkway entrance and any windows, if desired. Install the roofing material, such as metal sheets or shingles, to protect the shed from the elements.

Step 5: Add Doors and Finishing Touches

Install a walk-through door at one end of the shed, ensuring it is properly aligned and functions smoothly. Consider adding windows for natural light if desired. Apply a weather-resistant sealant or paint to protect the wood and enhance the appearance of your walk-through lean-to shed. Consider adding shelves, hooks, or storage solutions inside the shed to optimize its functionality.

Step 6: Create the Walkway

For the walkway section, use pressure-treated lumber or concrete slabs to create a solid and level pathway. Ensure that it is wide enough for easy movement and consider adding handrails for safety, if desired. Install any additional features you want along the walkway, such as lighting or seating areas.

Congratulations! You have successfully built a walk-through lean-to shed, providing both storage space and a covered pathway. Now you can enjoy the convenience and functionality of your new outdoor structure. Remember to prioritize safety during construction. If you are unsure about any step of the process, consult with a professional or seek expert advice.

Share:

Sunday, June 18, 2023

How to Build a Lean-In Storage Shed

How to Build a Lean-In Storage Shed

A lean-in storage shed is a practical and efficient solution for adding extra storage space to your property. Whether you need a dedicated area for gardening tools, outdoor equipment, or seasonal items, a lean-in storage shed offers a compact and accessible storage solution. In this article, I will guide you through the process of building a lean-in storage shed, allowing you to organize your belongings and create a clutter-free environment.

Step 1: Determine the Size and Location

The first step in building a lean-in storage shed is to determine the appropriate size and location for your needs. Consider the amount of storage space required and the available space on your property. Choose a location that is easily accessible and provides convenient access to your stored items. Take into account any local building codes or regulations that may affect the construction of your shed.

Step 2: Gather the Materials

Before you begin construction, gather all the necessary materials. Here's a list of the items typically required:

  • Pressure-treated lumber for the frame and supports
  • Plywood or oriented strand board (OSB) for the walls and roof
  • Roofing material (such as metal sheets or shingles)
  • Nails or screws
  • Door hinges and latch
  • Tools: measuring tape, circular saw, hammer, drill, level, ladder, and safety equipment

Make sure you have all the necessary materials on hand before you start building to avoid delays during construction.

Step 3: Build the Foundation

Start by preparing the foundation for your lean-in storage shed. Depending on your preference and local conditions, you can use concrete footings, concrete blocks, or gravel pads as a base. Ensure that the foundation is level and provides a stable surface for the shed.

Step 4: Construct the Frame

Once the foundation is in place, you can begin constructing the frame of the storage shed. Cut the pressure-treated lumber to the desired dimensions, following your chosen design. Build the walls and roof supports, ensuring that they are sturdy and properly aligned. Use nails or screws to secure the frame together.

Step 5: Install Walls and Roof

Attach the plywood or OSB sheets to the frame to form the walls and roof of your lean-in storage shed. Ensure that the panels are securely fastened and provide a weatherproof barrier. Cut openings for doors and windows, if desired. Install the roofing material, such as metal sheets or shingles, to protect the shed from the elements.

Step 6: Add Doors and Finishing Touches

Install the doors using hinges and a latch to secure the storage shed. Make sure the doors are properly aligned and can be easily opened and closed. Consider adding shelving or hooks inside the shed to maximize storage space and organization. Apply a weather-resistant sealant or paint to protect the wood and enhance the appearance of your lean-in storage shed.

Congratulations! You have successfully built a lean-in storage shed. Now you can enjoy the benefits of having a dedicated storage space for your belongings.

Remember to prioritize safety during construction. If you are unsure about any step of the process, consult with a professional or seek expert advice.

Share:

Saturday, June 17, 2023

How to Build a Free-Standing Lean-To

Free-Standing Lean-To

If you're in need of extra covered space on your property but don't want to attach a structure to your house, a free-standing lean-to can be the perfect solution. Whether you want to create a sheltered area for outdoor activities or need a storage space for your gardening tools, a free-standing lean-to offers flexibility and functionality. In this article, I will guide you through the process of building a free-standing lean-to, allowing you to expand your living space in a practical and cost-effective way.

Step 1: Choose the Location

The first step in building a free-standing lean-to is to select the ideal location on your property. Consider factors such as accessibility, sun exposure, and the purpose of the structure. Ensure that the ground is level and clear any debris or obstructions in the chosen area. It's also important to check local building codes or restrictions that may apply to the construction of a free-standing structure.

Step 2: Gather the Materials

Before starting the construction, gather all the necessary materials. Here's a list of the items you'll typically need:

  • Pressure-treated lumber for the frame
  • Roofing material (such as metal sheets or shingles)
  • Plywood for the roof and sides
  • Nails or screws
  • Concrete mix for the footings
  • Tools: measuring tape, circular saw, hammer, drill, level, ladder, and safety equipment

Having all the materials on hand will help streamline the construction process.

Step 3: Build the Frame

Start by constructing the frame of your free-standing lean-to. Begin with the two end walls by cutting and assembling the pressure-treated lumber according to your desired dimensions. Use a level to ensure that the walls are plumb and secure them to the ground using appropriate anchors. Then, connect the end walls with the roof trusses, making sure they are evenly spaced and properly secured.

Step 4: Install the Roof and Sides

After the frame is in place, it's time to install the roof and sides of your free-standing lean-to. Attach plywood sheets to the roof trusses, ensuring they are securely fastened. Consider adding a slight slope to allow for proper water drainage. For the sides, you can use plywood, lattice panels, or even screens, depending on your preferences and intended use. Secure them to the frame, making sure they are sturdy and weatherproof.

Step 5: Add Finishing Touches

Once the main structure is complete, you can add finishing touches to enhance the functionality and appearance of your free-standing lean-to. Apply a weather-resistant sealant or paint to protect the wood from the elements. Consider adding gutters to collect rainwater, shelves for storage, or lighting for convenience. These additional features can make your lean-to even more versatile and user-friendly.

Remember, safety should always be a priority during construction. If you are unsure about any step of the process, consult with a professional or seek expert advice.

Congratulations! You have successfully built a free-standing lean-to. Now you can enjoy the additional space and utilize it for various purposes.

Share:

Friday, June 16, 2023

Organize and Declutter: Practical 4x6 Lean to Shed Design Ideas

Practical 4x6 Lean to Shed Design Ideas

A 4x6 lean to shed offers a compact yet versatile space for organizing and decluttering your belongings. With smart design ideas, you can maximize storage efficiency and create an organized oasis. Discover practical 4x6 lean to shed design ideas to help you declutter and streamline your space.

1. Utilize Vertical Space

Make the most of your shed's vertical space by installing shelves, hooks, and hanging organizers. Utilize the walls to store tools, equipment, and other items, keeping the floor area clear and maximizing storage capacity.

2. Adjustable Shelving

Incorporate adjustable shelving units in your shed design. This allows you to customize the height and spacing of the shelves to accommodate items of various sizes. Adjustable shelves provide flexibility and adaptability as your storage needs change over time.

3. Clear Storage Bins

Opt for clear storage bins or containers to easily identify the contents without the need to open each one. Label the bins for quick reference, ensuring that everything has a designated place and can be found easily.

4. Pegboards and Tool Racks

Install pegboards or tool racks on the walls to keep your tools organized and easily accessible. Hang items such as hammers, screwdrivers, and wrenches for convenient storage and efficient use of space.

5. Overhead Storage

Take advantage of the overhead space in your shed by installing overhead storage racks or suspended shelves. This area is ideal for storing seasonal items or rarely used items that can be accessed with the help of a ladder or step stool.

6. Magnetic Strips

Attach magnetic strips to the walls or inside cabinet doors to store and organize small metal tools, such as drill bits or small wrenches. Magnetic strips keep these items visible and within easy reach, reducing clutter on the work surfaces.

7. Workbench with Storage

Incorporate a workbench into your shed design, complete with built-in storage options. Drawers, cabinets, and shelves integrated into the workbench provide a convenient place to keep tools, supplies, and project materials, keeping your workspace tidy.

8. Folding and Hanging Options

Maximize space efficiency by using folding and hanging options. Install fold-down work surfaces, folding chairs, or drop-leaf tables that can be tucked away when not in use. Use wall-mounted hooks or hangers to hang items like bicycles, ladders, or garden hoses.

9. Zone Planning

Divide your shed into functional zones based on the type of items you store. Create a gardening zone, a tool storage zone, a sports equipment zone, or any other specific areas that align with your needs. This zoning helps maintain order and makes it easier to locate items.

10. Proper Lighting

Ensure adequate lighting in your shed to make it easier to find items and work efficiently. Consider installing LED lights or overhead fixtures that provide bright and even illumination throughout the space.

By implementing these practical design ideas, you can transform your 4x6 lean to shed into a well-organized and clutter-free space. Utilize vertical storage, adjustable shelving, clear containers, and designated zones to create an efficient storage system. With a thoughtfully designed shed, you'll enjoy a streamlined and functional space that simplifies your organizational tasks and helps you declutter your belongings.

11. Labeling System

Implement a labeling system to ensure everything in your shed has a designated place. Use clear and legible labels on storage bins, shelves, and drawers. This makes it easier to locate items quickly and maintain an organized space.

12. Tool Wall Organizer

Create a tool wall organizer by mounting a pegboard or tool rack on one of the shed walls. Arrange your tools in a systematic order, keeping frequently used tools within easy reach. This not only saves space but also allows for efficient tool selection and storage.

13. Compact Storage Solutions

Invest in space-saving storage solutions specifically designed for small spaces. Look for compact shelving units, stackable storage containers, or hanging organizers that maximize storage capacity without taking up excessive floor space.

14. Utilize the Shed Door

Don't overlook the back of your shed door as valuable storage space. Install hooks or racks on the door to hang small tools, gardening gloves, or other accessories. This clever use of space keeps frequently used items easily accessible and frees up room inside the shed.

15. Create a Recycle and Donation Station

Designate an area within your shed for recycling and donation items. Install separate bins or containers for recyclables, and designate a section for items you no longer need but can be donated. This encourages responsible disposal and keeps your shed clutter-free.

16. Wall-Mounted Cabinets

If you have limited floor space, consider installing wall-mounted cabinets. These cabinets provide additional storage without obstructing your movement within the shed. They are perfect for storing smaller items or keeping hazardous materials out of reach.

17. Utilize Ceiling Space

Make use of the ceiling space in your shed by installing overhead racks or hanging shelves. This area is suitable for storing items that are used less frequently, such as seasonal decorations or camping gear. By utilizing the ceiling, you maximize the storage capacity of your shed.

18. Outdoor Storage Solutions

If your shed's interior space is limited, consider incorporating outdoor storage solutions around the shed. Install hooks, racks, or shelves on the exterior walls to store frequently used items, such as gardening tools or sports equipment. This expands your storage options while keeping the interior organized.

19. Create a Workspace

If you plan to use your shed as a workspace, ensure you have a designated area for projects. Install a sturdy workbench or table that provides ample surface area for your tasks. Include storage drawers or cabinets beneath the work surface to keep tools and supplies within reach.

20. Regular Maintenance and Cleaning

Maintaining an organized shed requires regular maintenance and cleaning. Set aside time periodically to declutter, reorganize, and remove any items that are no longer needed. This helps you stay on top of your storage system and ensures a well-organized and functional shed.

By implementing these practical 4x6 lean to shed design ideas, you can create a space that promotes organization and decluttering. Utilize vertical and overhead storage, label your items, and create designated zones for different categories of belongings. With a well-organized shed, you'll enjoy easier access to your items and a cleaner, more functional space.

Share: