Showing posts with label Lean-To Off. Show all posts

Monday, April 24, 2023

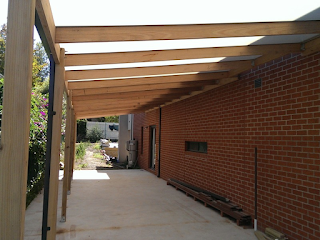
Install Plywood and Roofing on Lean-to Off Garage

Install Plywood and Roofing on Lean-to Off Garage

Once the frame of your lean-to off a garage is built and secured, the next step is to install the plywood sheathing and roofing materials. This will provide a solid base for the roof and protect the interior of the lean-to from the elements.

Materials Needed:

  • Plywood sheets
  • Nails or screws
  • Roofing materials (such as asphalt shingles or metal roofing)
  • Roofing nails or screws
  • Roofing underlayment
  • Roofing felt or tar paper
  • Roofing sealant
  • Roofing tools (such as a hammer, screwdriver, and utility knife)

Read also Other Material you need

Step 1: Install Plywood Sheathing

Start by installing plywood sheathing on the roof frame of your lean-to. Use plywood sheets that are compatible with your local building codes and regulations, and ensure that they are properly sized and positioned to cover the entire roof surface. Attach the plywood to the roof frame using nails or screws, following the manufacturer's instructions for spacing and fastening. Be sure to align the edges of the plywood sheets and leave appropriate gaps for expansion and contraction.

Step 2: Install Roofing Underlayment

Next, install roofing underlayment over the plywood sheathing. Roofing underlayment is a protective layer that provides an additional barrier against moisture and helps to prevent leaks. Use roofing felt or tar paper, following the manufacturer's instructions for installation. Start at the bottom edge of the roof and overlap each layer as you work your way up, securing the underlayment with roofing nails or staples.

Step 3: Install Roofing Materials

Once the roofing underlayment is in place, you can install the roofing materials of your choice. This could be asphalt shingles, metal roofing, or any other type of roofing material that meets your needs and local building codes. Follow the manufacturer's instructions for installation, ensuring that the roofing materials are properly aligned, secured, and sealed. Use roofing nails or screws as recommended by the manufacturer, and apply roofing sealant as needed to create a watertight seal.

Step 4: Finishing Touches

After the roofing materials are installed, you can add finishing touches to complete your lean-to off a garage. This may include adding trim around the edges of the roof, installing gutters and downspouts to channel water away from the lean-to, and applying any other desired finishing touches to enhance the appearance and functionality of the structure.

Conclusion

Installing plywood sheathing and roofing materials is a critical step in building a lean-to off a garage. It provides a solid base for the roof, protects the interior from the elements, and ensures that the structure is watertight and durable. By following the steps outlined in this article and using appropriate materials and techniques, you can successfully install plywood and roofing on your lean-to, creating a functional and attractive addition to your garage.

Share:

Materials for Building a Lean-to off a Garage

Materials for Building a Lean-to off a Garage

Before starting any construction project, it's important to gather all the necessary materials to ensure a smooth and efficient build. Here's a list of common materials you may need when building a lean-to off a garage:

1. Pressure-Treated Lumber

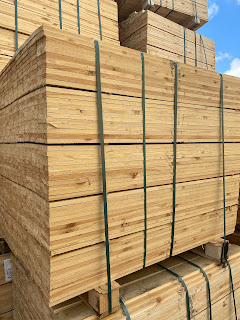
Pressure-treated lumber is a must for any outdoor construction project, as it is resistant to rot, decay, and insect damage. You'll need pressure-treated lumber for framing the walls, roof, and supports of the lean-to. Make sure to select the appropriate sizes and lengths for your project, and check for any knots or defects that may weaken the lumber.

2. Plywood

Plywood is typically used to sheath the walls and roof of the lean-to. Look for exterior-grade plywood that is suitable for outdoor use and can withstand the elements. Choose the appropriate thickness for your project, and make sure to properly fasten the plywood to the frame to ensure stability and durability.

3. Roofing Material

The type of roofing material you choose will depend on your budget, climate, and aesthetic preferences. Common options include asphalt shingles, metal roofing, and corrugated panels. Make sure to follow manufacturer's instructions for installation and consider factors such as slope, ventilation, and insulation for optimal performance.

4. Fasteners

You'll need a variety of fasteners to securely attach the lumber and plywood together. Common fasteners include nails, screws, and bolts. Choose the appropriate type, size, and length for your project, and make sure to use corrosion-resistant options for outdoor use.

5. Concrete and Post Anchors

If you're building a lean-to with posts, you'll need concrete and post anchors to securely anchor the posts to the ground. Follow local building codes and regulations for proper installation, and make sure the posts are plumb and level for a sturdy structure.

6. Flashing and Sealant

To protect against moisture infiltration, it's important to use flashing and sealant at critical areas such as the junctions between the lean-to and the garage, as well as around windows, doors, and roof penetrations. Choose weather-resistant flashing and a compatible sealant to ensure a watertight seal and prevent water damage.

7. Optional Finishing Touches

Depending on your preferences and budget, you may also consider optional finishing touches to enhance the appearance and functionality of your lean-to. This can include paint or stain for added protection and aesthetic appeal, gutters and downspouts for rainwater management, and lighting or electrical components for increased usability.

Make sure to carefully plan and gather all the necessary materials before starting your lean-to construction project. It's important to use high-quality materials that are suitable for outdoor use to ensure a durable and long-lasting lean-to that meets your needs and enhances the value of your property.

Share:

How to Build a Lean-To Off a Garage

How to Build a Lean-To Off a Garage

Adding a lean-to to your garage can provide additional storage space, shelter for outdoor equipment, or even a covered area for a workspace. It's a great DIY project that can be accomplished with basic carpentry skills and tools. In this guide, we will walk you through the step-by-step process of building a lean-to off a garage.

Materials You Will Need

  • Lumber (pressure-treated recommended)
  • Plywood
  • Roofing material (shingles or metal panels)
  • Nails or screws
  • Roofing nails or screws
  • Level
  • Tape measure
  • Saw (circular saw or miter saw)
  • Hammer or drill
  • Roofing nailer or screwdriver
  • Paint or stain (optional)

Step-by-Step Guide to Building a Lean-To Off a Garage

Step 1: Plan and Measure

Start by planning the size and location of your lean-to. Measure the area where you want to build the lean-to, taking into account the height, width, and depth of the space. Consider factors such as the slope of the ground, the orientation of the lean-to in relation to the garage, and any local building codes or regulations.

Step 2: Gather Materials and Tools

Once you have determined the size and location of your lean-to, gather all the materials and tools you will need. Purchase or gather the appropriate amount of lumber, plywood, and roofing material based on your measurements. Make sure you have all the necessary nails or screws, a level, a tape measure, a saw, and a hammer or drill for the construction process.

Step 3: Build the Frame

Using pressure-treated lumber for durability, begin by constructing the frame of the lean-to. Start with the side walls by attaching vertical studs to the garage wall and the ground, using a level to ensure they are plumb. Then, attach horizontal studs to connect the vertical studs and form the top plate. Repeat this process for the front and back walls of the lean-to.

Next, install the roof rafters, attaching them to the top plate of the side walls at the desired pitch. Use a level to make sure the rafters are level and evenly spaced. Install additional rafters as needed for support.

Step 4: Install Plywood and Roofing

Once the frame is complete, cover the roof with plywood, leaving a slight overhang at the edges. Secure the plywood to the rafters with nails or screws, following the manufacturer's instructions.

Finally, install the roofing material of your choice, whether it's shingles or metal panels. Follow the manufacturer's instructions for proper installation, including any necessary sealing or flashing to prevent water leaks.

Step 5: Optional Finishing Touches

If desired, you can finish your lean-to by painting or staining the lumber to match your garage or home's aesthetic. This can provide added protection against the elements and enhance the overall appearance of your lean-to.

Conclusion 

Building a lean-to off a garage can be a rewarding DIY project that not only adds functionality to your property but also enhances its overall value. With careful planning, proper construction techniques, and attention to detail, you can create a durable and functional lean-to that will serve your needs for years to come. Remember to always check local building codes and regulations, and seek professional assistance if needed. Happy building!

Share: