Showing posts with label Back Wall. Show all posts

Wednesday, April 12, 2023

DIY Lean-To Shed Roof and Walls

Lean-To Shed Roof and Walls

A constructing a lean-to shed can be a fulfilling and practical project that provides valuable storage space for your outdoor belongings. The roof and walls are crucial components of the shed that require careful consideration and proper construction techniques to ensure durability, stability, and protection from the elements. In this article, we will guide you through the steps to build the roof and walls of a lean-to shed, using active voice and a friendly tone, to help you create a functional and attractive outdoor structure that meets your specific needs.

Step 1: Roof Framing

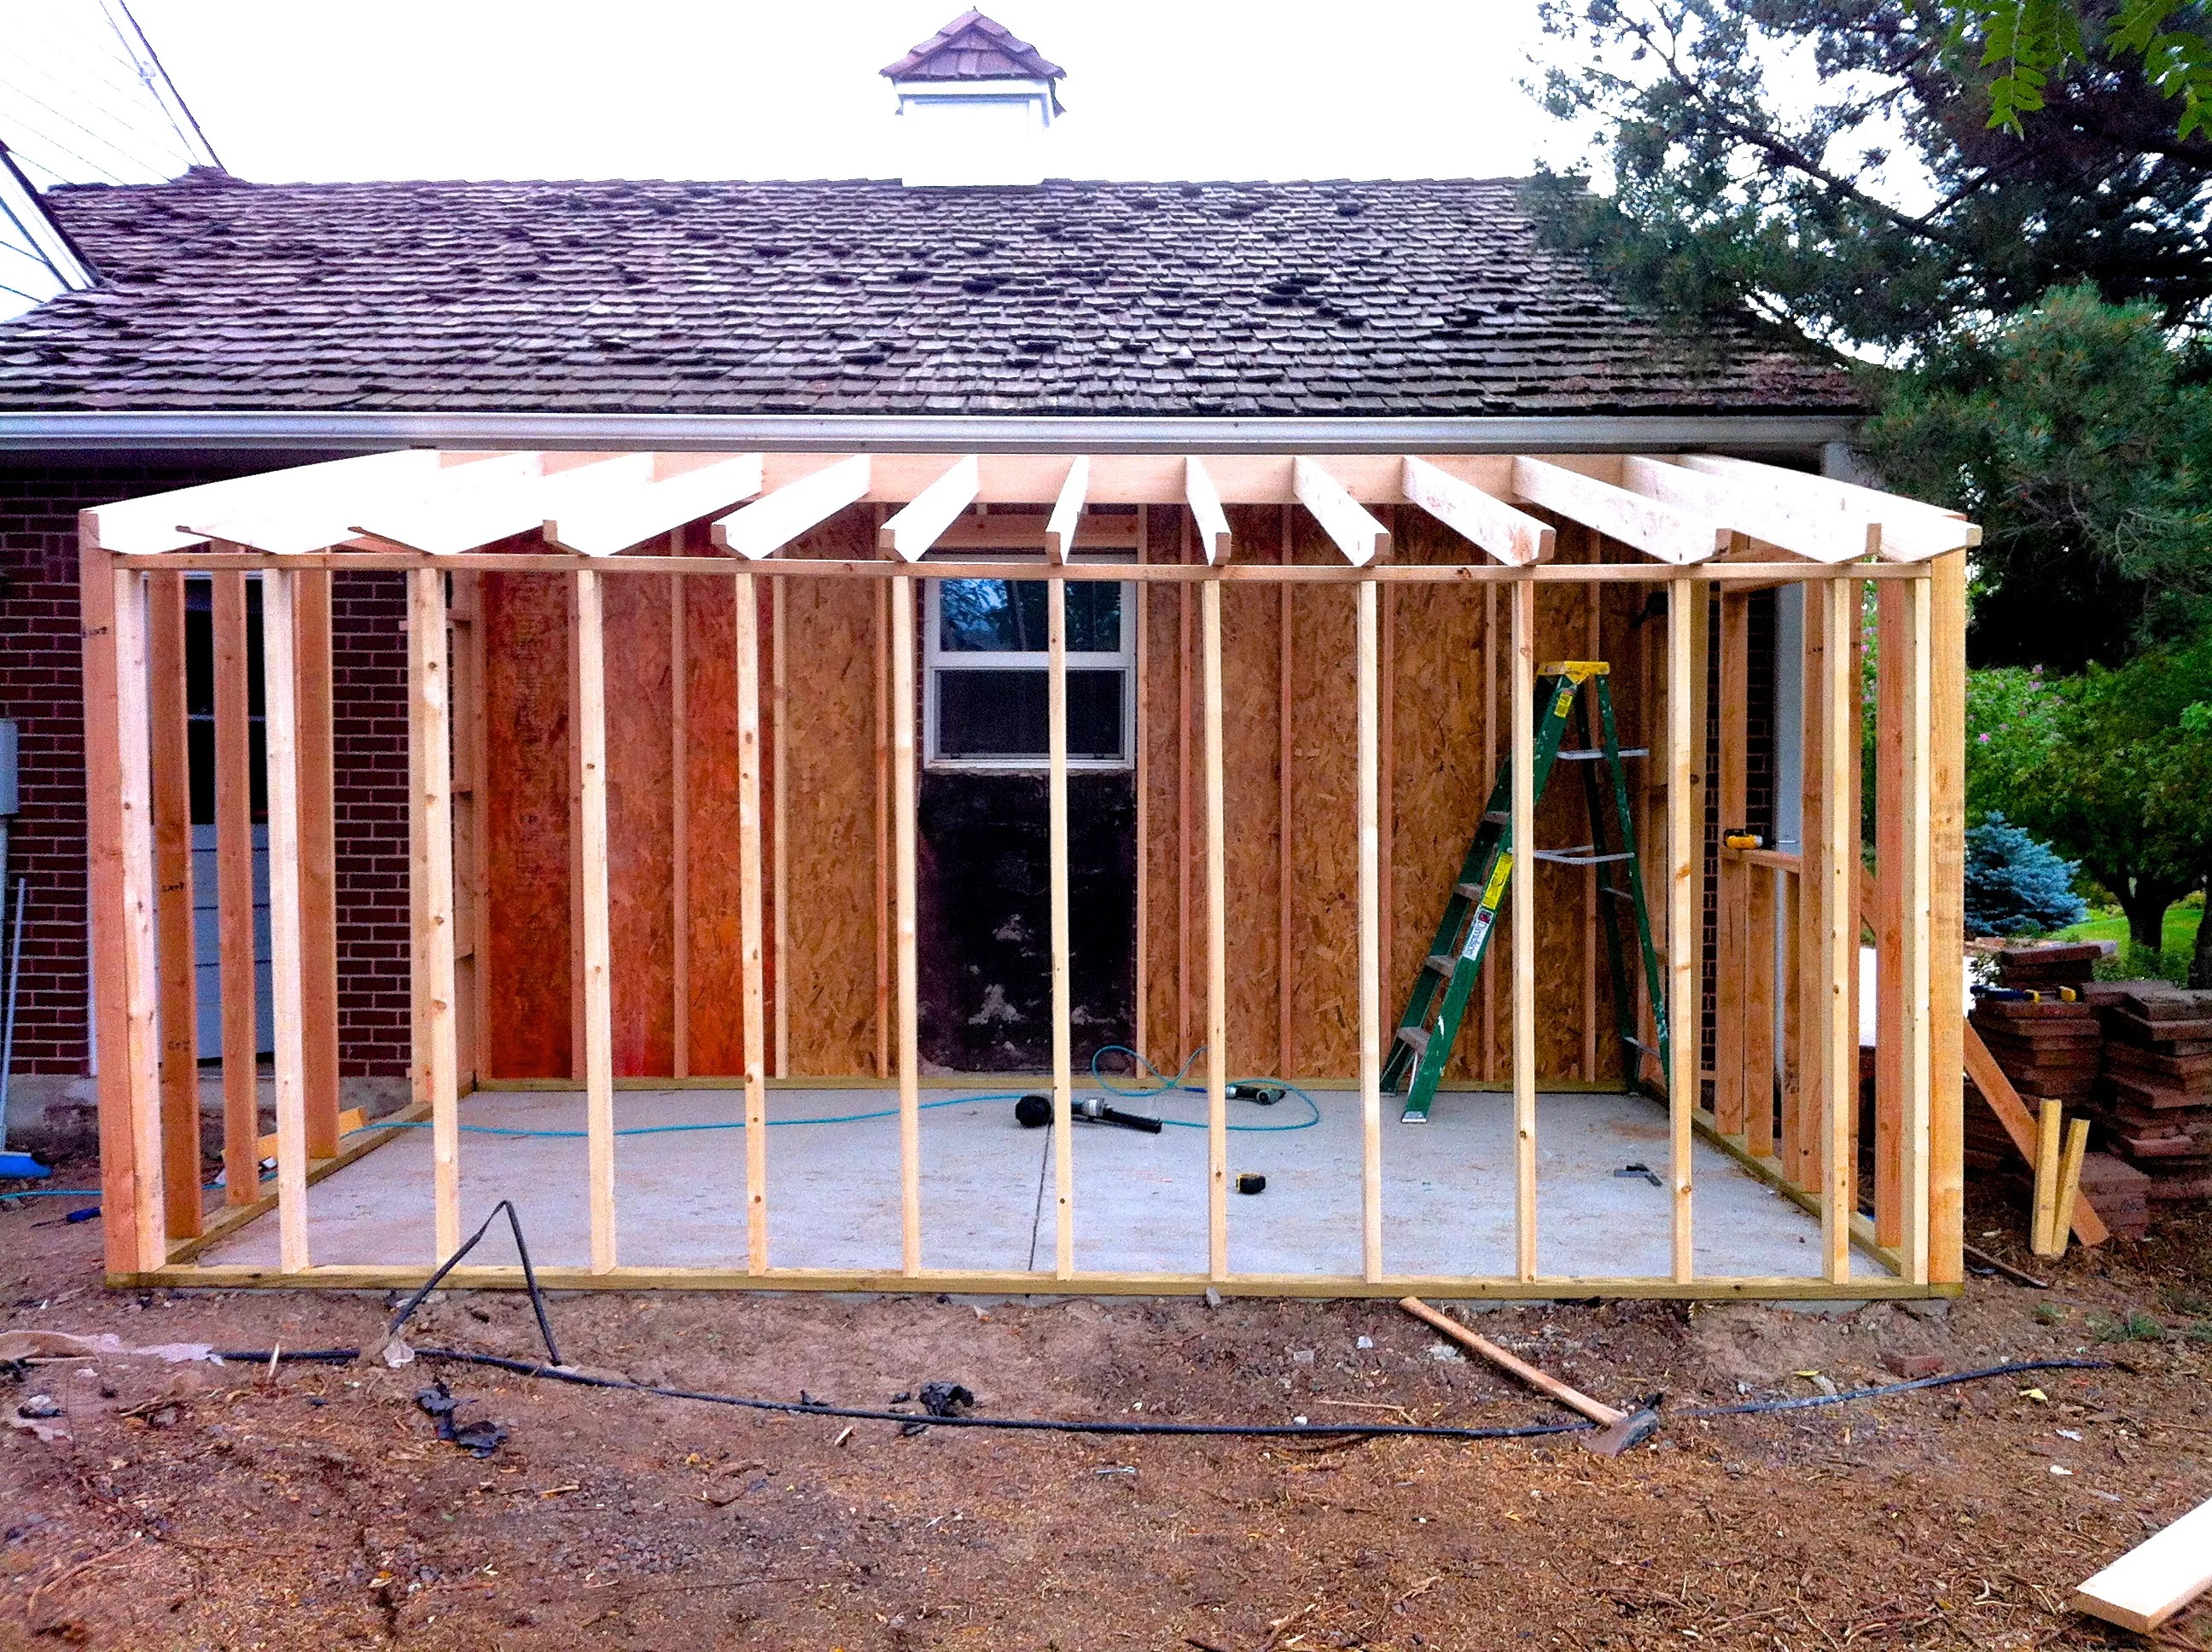
The roof is a critical part of your lean-to shed as it provides shelter and protects the contents of the shed from rain, snow, and other environmental elements. Follow these steps to frame the roof:

  1. Measure and cut the rafters: Determine the length and slope of your roof and use these measurements to cut the rafters from green lumber. Rafters are the diagonal members that support the roof and give it its pitch. Make sure to cut them accurately and to the proper length.
  2. Mark the top plate: On the top plate of the shed's walls, mark the locations where the rafters will be attached. Use a framing square to ensure the markings are square and level.
  3. Attach the rafters: Nail or screw the rafters to the top plate, making sure they are aligned with the markings and spaced evenly. Use a level to check for plumb and adjust as needed.
  4. Install ridge beam or ridge board: Depending on your design, you may need to install a ridge beam or a ridge board to provide additional support to the rafters at the peak of the roof. Secure it in place with nails or screws.
  5. Add roof sheathing: Once the rafters and ridge are in place, you can install the roof sheathing, which is the plywood or OSB (oriented strand board) that covers the roof framing. Nail or screw the sheathing to the rafters, leaving appropriate gaps for ventilation as per local building codes.
  6. Install drip edge and roofing material: To protect the roof from water damage, install a drip edge along the eaves and rake edges of the roof. Then, apply the roofing material of your choice, such as shingles or metal sheets, following the manufacturer's instructions.

Step 2: Wall Framing

The walls of your lean-to shed provide structural support and enclosure for the contents of the shed. Follow these steps to frame the walls:

  1. Measure and cut the wall studs: Measure and cut the wall studs from green lumber, according to your shed's design and dimensions. Make sure to cut them accurately and to the proper length.
  2. Mark the wall plate: On the bottom plate of the shed's walls, mark the locations where the wall studs will be attached. Use a framing square to ensure the markings are square and level.
  3. Attach the wall studs: Nail or screw the wall studs to the bottom plate, making sure they are aligned with the markings and spaced evenly. Use a level to check for plumb and adjust as needed.
  4. Add additional framing members: Depending on your design, you may need to add additional framing members, such as headers, cripple studs, and corner studs, to provide structural support and reinforcement for openings such as doors and windows.
  5. Install door and window frames: If your lean-to shed includes doors and windows, install the door and window frames according to the manufacturer's instructions. Make sure they are plumb, level, and square to ensure proper operation and fit.
  6. Attach wall sheathing: Once the wall framing is complete, you can attach the wall sheathing, which is typically made of plywood or OSB. Nail or screw the sheathing to the wall studs, leaving appropriate gaps for ventilation as per local building codes.
  7. Install siding: After the sheathing is in place, you can install the siding of your choice, such as wood, vinyl, or metal. Follow the manufacturer's instructions for proper installation, including any required weatherproofing measures.
  8. Add trim and finishing touches: To give your lean-to shed a polished look, add trim and finishing touches, such as corner boards, fascia, soffit, and any other decorative elements you desire. Sand, paint, or stain the exterior of the shed to protect it from the elements and enhance its appearance.

Conclusion

Building a lean-to shed with green lumber requires careful planning and precise construction techniques to ensure a sturdy and durable structure. By following the steps outlined in this article, you can successfully frame the roof and walls of your lean-to shed, creating a functional and attractive outdoor storage space that meets your specific needs. Remember to always comply with local building codes and regulations, and seek professional assistance if you are not confident in your woodworking skills. With proper care and maintenance, your DIY lean-to shed will provide years of reliable service.

Share:

Tuesday, April 11, 2023

Lean to Shed Plans 12x20 Free Guide


Lean to Shed Plans 12x20 Free Guide

If you're in need of extra storage space in your backyard, a lean to shed can be a great solution. Lean to sheds are versatile and functional, providing a simple and cost-effective way to store your tools, equipment, and other belongings. In this article, we'll provide you with free lean to shed plans for a 12x20 size shed, along with step-by-step instructions on how to build it. So let's get started!

Benefits of Building a Lean to Shed

Before we dive into the details of building a lean to shed, let's explore some of the benefits it can offer:

  • Cost-effective: Lean to sheds are generally more affordable compared to traditional sheds or other outdoor storage options.
  • Space-saving: Lean to sheds are designed to be attached to an existing structure, such as a wall or a fence, which saves space in your yard.
  • Easy to build: With their simple design and fewer components, lean to sheds are relatively easy to construct, even for novice DIYers.
  • Customizable: Lean to sheds can be customized to fit your specific storage needs and aesthetic preferences.
  • Durable: When built correctly using quality materials, lean to sheds can withstand various weather conditions and provide long-lasting storage solutions.

Materials and Tools You'll Need

Before you start building your lean to shed, gather the following materials and tools:

Materials:

  • Pressure-treated lumber for framing and flooring
  • Plywood sheets for siding and roofing
  • Roofing materials, such as shingles or metal panels
  • Galvanized nails or screws
  • Door and window hardware, if applicable
  • Paint or stain for finishing, optional

Tools:

  • Measuring tape
  • Level
  • Circular saw or miter saw
  • Hammer or drill
  • Screwdriver or screw gun
  • Roofing nail gun or hammer
  • Safety goggles and gloves

Step-by-Step Instructions

Follow these step-by-step instructions to build your own lean to shed:

Step 1: Choose a Location and Obtain Permits

Decide on the location for your lean to shed, keeping in mind factors such as accessibility, drainage, and proximity to other structures. Measure and mark the dimensions of your shed on the ground, ensuring it's level and square. Check with your local building department to obtain any necessary permits or approvals before proceeding with construction.

Step 2: Build the Foundation

A solid foundation is crucial for the stability and durability of your lean to shed. Depending on your preference and local building codes, you can choose from the following options:

  • Concrete slab: Excavate the marked area to the required depth, level the ground, and pour a concrete slab. Allow it to cure as per manufacturer's instructions.
  • Wooden skid foundation: Level the ground and lay pressure-treated 4x4 or 6x6 skids parallel to the length of the shed, spaced evenly. Use a level to ensure they are level and secure them with galvanized nails or screws.

Step 3: Construct the Frame

Once your foundation is in place, you can start building the frame of your lean to shed. Follow these steps:

  1. Attach ledger board: If your shed will be attached to an existing structure, such as a wall or a fence, attach a pressure-treated ledger board to the structure using lag screws or bolts. Make sure it's level and secure.
  2. Build the side walls: Cut pressure-treated 2x4s to the desired height of your shed walls. Install vertical studs at 16-inch intervals, and horizontal top and bottom plates. Attach the side walls to the ledger board and secure them to the foundation using galvanized nails or screws.
  3. Build the back wall: Cut pressure-treated 2x4s to the width of your shed and install vertical studs at 16-inch intervals, and horizontal top and bottom plates. Attach the back wall to the side walls and secure it to the foundation.
  4. Build the front wall: If your shed will have a front wall, follow the same steps as the back wall, but leave an opening for the door.

Step 4: Install the Roof

The next step is to install the roof of your lean to shed. Here's how:

  1. Install rafters: Cut pressure-treated 2x4s to the length of your shed and install them at 24-inch intervals, perpendicular to the side walls or the ledger board. Make sure they are level and secure.
  2. Install plywood sheathing: Cut plywood sheets to fit the roof and attach them to the rafters using galvanized nails or screws.
  3. Install roofing materials: Depending on your preference, install shingles or metal panels on top of the plywood sheathing, following the manufacturer's instructions.

Step 5: Install Siding and Doors/Windows

With the roof in place, you can now install the siding and doors/windows, if applicable:

  1. Install siding: Cut plywood or other siding materials to the desired size and attach them to the frame using galvanized nails or screws. Paint or stain the siding as desired for added protection and aesthetics.
  2. Install doors/windows: If your shed will have doors or windows, install them according to the manufacturer's instructions. Make sure they are properly sealed to prevent water leakage.

Step 6: Finish and Customize

Finally, you can add finishing touches to your lean to shed to make it functional and visually appealing:

  • Paint or stain: Apply paint or stain to the exterior of your shed to protect it from the elements and enhance its appearance.
  • Add shelves or hooks: Install shelves or hooks inside your shed for organized storage of tools, equipment, and other items.
  • Customize:Add any additional features or customization options that suit your needs, such as windows, skylights, vents, or a workbench. You can also personalize your lean to shed with decorative elements such as trim, shutters, or a flower box to add charm and character to your outdoor space.
  • Ensure proper drainage: Make sure your shed has proper drainage by sloping the ground away from the shed and installing gutters and downspouts to divert water away from the foundation.
  • Secure your shed: Install sturdy locks and hinges on doors and windows to secure your shed and protect your tools and equipment from theft.
  • Maintain your shed: Regularly inspect and maintain your lean to shed to ensure it remains in good condition. This may include painting or staining, repairing any damage, and keeping it clean and organized.

Conclusion

Building a lean to shed can be a rewarding DIY project that provides you with additional storage space for your outdoor belongings. By following the steps outlined in this article, you can construct a sturdy and functional shed that meets your needs and enhances the aesthetics of your outdoor space. Remember to carefully plan your shed design, obtain necessary permits, use quality materials, and follow best practices for construction to ensure a successful outcome. With the right tools, materials, and a little bit of patience, you can enjoy the benefits of a well-built lean to shed for years to come.

So, if you're in need of extra storage space and looking for free lean to shed plans for a 12x20 shed, use the steps and tips provided in this article to guide you through the construction process. With careful planning, attention to detail, and some DIY skills, you can create a functional and aesthetically pleasing lean to shed that meets your storage needs and enhances your outdoor space.

Share:

Lean To Shed: Build the Back Wall

Lean To Shed Build the Back Wall

If you're planning to build a lean to shed, the back wall is a critical component of the structure. It provides stability and support for the shed, and serves as a barrier against the elements. In this article, we will guide you through the process of building the back wall for your lean to shed, providing step-by-step instructions and tips to ensure a successful construction project. So, grab your tools and let's get started!

Materials and Tools You'll Need

Before you begin building the back wall of your lean to shed, make sure you have all the necessary materials and tools on hand. Here's a list of what you'll need:

  • Pressure-treated lumber for framing, such as 2x4 or 2x6 boards
  • Plywood sheets for sheathing, preferably 1/2 inch or thicker
  • Nails or screws for framing and sheathing
  • Level, square, and measuring tape for accurate measurements and leveling
  • Circular saw or miter saw for cutting lumber
  • Hammer or nail gun for securing lumber
  • Safety goggles, gloves, and ear protection for safety

Step 1: Measure and Cut Lumber for Back Wall Framing

The first step in building the back wall of your lean to shed is to measure and cut the lumber for the framing. The size and design of your shed will determine the dimensions of the back wall. Measure and mark the locations of the wall studs on the top and bottom plates of the framing lumber, ensuring that they are spaced evenly and according to your shed plans.

Use a circular saw or miter saw to make straight cuts on the lumber according to your measurements. Make sure the cuts are precise and square, as this will ensure the stability and alignment of the back wall.

Step 2: Assemble the Wall Framing

Once you have cut all the lumber for the back wall framing, it's time to assemble the wall. Lay the bottom plate on the ground, and align the wall studs on top of it according to your measurements. Use a level to ensure that the studs are plumb (vertically straight) and level (horizontally straight).

Secure the studs to the bottom plate with nails or screws, ensuring that they are properly aligned and evenly spaced. Repeat the process with the top plate, aligning and securing the studs to it in the same manner. Check for squareness using a carpenter's square to ensure that the back wall is properly squared.

Next, add additional studs or framing as needed for windows, doors, or any other openings in the back wall, following your shed plans. Make sure all the framing is securely fastened and aligned properly to ensure stability and structural integrity.

Step 3: Sheath the Back Wall with Plywood

After assembling the back wall framing, it's time to sheath it with plywood for added strength and rigidity. Measure and cut plywood sheets to fit the back wall, leaving space for any openings such as windows or doors. Use a circular saw or miter saw to make straight cuts on the plywood.

Place the plywood sheets on the back wall framing, ensuring they are flush with the edges of the framing and properly aligned. Nail or screw the plywood sheets to the framing, spacing fasteners according to the manufacturer 's recommendations for your specific plywood thickness. Be sure to follow proper nailing or screwing techniques to prevent splitting or damaging the plywood.

If your shed plans call for insulation in the back wall, now is the time to install it before sheathing with plywood. Follow the insulation manufacturer's instructions for proper installation, ensuring that the insulation is snugly fit between the studs and properly secured.

Step 4: Add Windows and Doors

If your back wall includes windows or doors, now is the time to install them. Follow your shed plans and manufacturer's instructions for proper installation. Make sure the openings are properly framed and flashed to prevent water infiltration and ensure a weather-tight seal.

If your shed plans do not include windows or doors in the back wall, you may choose to add vents for proper air circulation inside the shed. Follow manufacturer's instructions for proper vent installation to prevent moisture buildup and promote ventilation.

Step 5: Check for Alignment and Squareness

Once you have completed the framing, sheathing, and installation of windows or doors, it's important to check for alignment and squareness of the back wall. Use a level, square, and measuring tape to ensure that the back wall is plumb, level, and square.

If any adjustments are needed, make them at this stage to ensure that the back wall is properly aligned and square. This will ensure that the rest of the shed construction will proceed smoothly and result in a sturdy and stable structure.

Step 6: Conclusion

Building the back wall of your lean to shed is a crucial step in the construction process. It provides stability, support, and protection against the elements. By following the steps outlined in this article, you can ensure that your back wall is properly framed, sheathed, and aligned, resulting in a strong and durable lean to shed.

Remember to always follow your shed plans and manufacturer's instructions for proper construction techniques and materials. Take the time to accurately measure and cut your lumber, properly assemble the framing, and securely fasten the plywood sheathing. Check for alignment and squareness at each stage of the construction process to ensure a successful build.

With careful planning, attention to detail, and the right materials and tools, you can confidently build the back wall of your lean to shed and enjoy a functional and attractive outdoor storage space for years to come.

Share: